Translate

Friday, November 21, 2025


4 195W and 2 440W panels

After I set up my new ground mounted solar array recently (4 195W panels) I realized that I was only getting peak power of around 350W, so I decided to order a couple more 240 W panels from Amazon.  When they arrived (in a cardboard box weighing almost 80 pounds!) one of them was damaged beyond repair so I sent them back and then started looking online for solar dealers here in Maine.  I was surprised and delighted to find a company called Greentech Renewables that had just opened up a huge warehouse a few months ago.  They are about 15 minutes from my home soI stopped by and talked to their salesperson Eric who was very friendly.  I told him I was looking for a couple of high power solar panels around 450 W and he said he had quite a number of them.  So I asked him what the dollars per Watt was for these panels and he said that they were about $0.35.  Wow!  When I installed my first 20 panels 16 years ago the cost was nearly $4 per Watt, prices have really come down!  And the icing on the cake is that these panels were assembled in the USA by Canadian Solar, so no tariffs involved!  

So I paid for them and said I would come back in an hour or two with my trailer to pick them up.  I didn't realize how big these panels would be until I got there.  They are almost 4 x 6' and required two people to move them.  They put 2 on a shipping pallet and fork lifted them onto my trailer.  I asked if I could keep the pallet which is constructed from fresh clean looking 2X6 lumber and they said "Sure!".  So I cut them up with my chainsaw and I'm using them to heat my workshop:


I then went to my local metal supplier and purchased some angle aluminum so I could construct a hinged mount that I bolted right on to the back of the 2 new panels.  The metal strip on the bottom is secured to the ground with tent pegs so they can't blow over.  Of course I will need to shovel snow away from the front of them in the winter, but that's a small price to pay and I do have a snowblower.


Here's the front view of the full solar array with the newest panels on the right: 

You can also see the solar thermal solar collectors that are used to heat the hot water in my house and a 250 W solar panel that also works as a sunshade for the second floor bedroom.

Wiring for this array was complicated.  In order to optimize power there are two pairs on the left wired in series and the large ones on the right are wired in parallel and then they all combined in parallel to feed into the inverter.  Since the panels are different voltages, the power defaults to the lowest voltage which is a compromise, but so far it's working okay.

According to my calculations they should be producing peak power of 1000 W, but at this time of year with the solar angle being so low I'm getting a little less than that.  The screenshot below shows the energy produced for the last several days.  Day one was the original four panels panels, day two I added the first of two 440 W panels, and then on day three I connected the second 441 panel.  As you can see him offsetting my electric bill by about 3.6 kWh per day which will really add up.

The main reason reason for my adding these panels is that my annual cost of electricity is about $1000.  This is largely due to the two heat pumps and my electric vehicle and I'm slowly working my way towards a zero electric bill.  Next year I'm considering replacing the 29 panels on my workshop with newer much higher power panels.  This should get me to a net energy of zero.  

The other thing affecting my electric bill is that the utility company has been slowly ramping up a surcharge for those of us with solar.  Years ago there was no surcharge, then it went to $22 and now about $44 per month which adds up to $528 per year.  I understand the reasoning, because they have no revenue from me to support the infrastructure, but $44 seems egregious considering that my solar panels are enhancing power quality in my region and reducing the load on their transmission lines.  

Thanks to net energy billing I get full retail credit for every kilowatt hour that I export back into the grid.  Essentially, the utility is paying me for the power I put into their grid and when I reach the point of generating more than a use on an annual basis I will not benefit financially, but that's fine with me.  The way that net metering works is that every kilowatt hour I put back into the grid gives me a credit in kilowatt hours.  For five months or more in the summer I accumulate credits that I then use up into October and November.  At that point the trade-off of solar powered heat pumps doesn't work so well because we have so little sunlight here at 45° latitude and those heat pumps require a lot of energy to operate.  My bills in January and February were over $350 this year.  So my goal is to accumulate enough credit in the summer to carry me all the way through the winter.

I'm 70 years old now and working at reducing my operating costs by investing some money in solar equipment now so that I don't have to pay it out later to the utilities who are constantly raising their rates.  Given the very low cost of solar panels right now, this makes good financial sense as the return on investment is better than the stock market.  


Wednesday, November 5, 2025

Adding 4 solar panels on the ground

Solar arrays on my workshop

 My solar power system consists of 37 solar panels mounted on my workshop building and another 250 W panel mounted on my house facing south.  The original 30 panels were only rated at 175W when I installed them 16 years ago.  Then I added additional panels rated 2 tilting 245 W panels and 6 more 375 W.  The problem is in the last few years I have added heat pumps which draw an enormous amount of power during the winter months and my electric bill shoots up from zero (actually, $42 minimum connection fee charged by my utility for the "privilege" of being connected!) through the summer to over $300 in January and February.

With electric rates increasing dramatically I am looking at options.  In my home I'm shifting back to using a propane heater for my living room because the heat pump is unreasonably expensive to operate and in both buildings I'm using more firewood to offset the use of heat pumps and fossil fuel.

Last winter when my propane automatic standby generator failed I was without power for four days and this was unacceptable so I purchased two solar panels and a battery generator as documented in this recent post.  Then in the spring I decided to use the battery generator as a backup power supply for my 3D printers and stored the solar panels inside my workshop.  I realized this was pointless because I was literally losing money from energy these two panels were not generating.


So this October I decided to deploy those two 195W bifacial panels and add a couple more similar panels but they're not bifacial, however monocrystalline panels are much more efficient in low light.  Bifacial panels can generate up to 15% more power from the back especially when there is snow on the ground to reflect light onto the back. 

The panels are facing south and tilted up at a high angle to account for the low winter solar elevation angle. 

Panel specs 


Here's a back view showing the bifacial panels on the right.  These are all made by a company called Eco-worthy who make very high quality and very affordable panels and I bought them on Amazon.


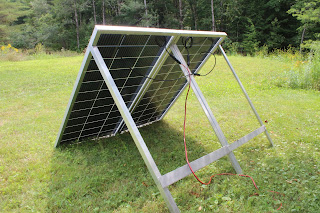
 I made my own mounting system using aluminum L extrusions that I riveted together.  This cost me roughly $40 per panel and should hold up well.  The whole mounting system folds up flat so I can take it down and store it should I need to.  Cearly, I will need to shovel snow away from the bottom of these panels in the winter.  But that's no big deal to me.


It's fall here in Maine and the time of year where we get very strong winds so I used tent pegs to secure the bottom of the mounting brackets firmly so they won't blow over.


All of my other solar panels are connected to the grid using micro-inverters made by Enphase.  (One micro-inverter for every solar panel).  However over the last 16 years 17 of the 32 original inverters have failed.  These were first generation technology and they have been replacing the failed units under warranty with seventh generation technology, but my warranty has now expired.  My trust in that system has eroded over time and I decided to use a string inverter.  String inverters take multiple solar panels connected in series and/or parallel and convert that to 120 V AC or 240 V AC.

Series-parallel connections
I connected the panels in this configuration as shown above which is the optimal one for best energy performance and the smallest gauge power cable required to feed the solar energy to the inverter.  The inverter wants to see a DC solar input from 22 V to 65 V.  By wiring two panels in series I get approximately 44 V and then by connecting them in parallel I optimize the power delivered to the inverter


I needed a couple of Y adapters in order to connect the two pairs of panels to the main cable that feeds into the inverter. Solar power cables use MC4 connectors which snap together and form a fully weatherproof connection.   These connect to red and black 10gauge wires that go across my yard for about 15 feet where they pass through the wall and down into my basement where the inverter is.


I purchased a weatherproof cable entry cover so I can prevent weather and critters from crawling in to my house.  These are typically used on campers and boats.

Down in the basement, I was able to install the (blue) inverter right next to my breaker panel.  I used more 10 gauge wire than I needed and tucked it up in the ceiling in case I need to move the solar panels.  Power comes out of the inverter at the bottom and that power cord plugs directly into an outlet to back-feed the outlet.

This is a G2 Series Grid Tied Inverter (model SUN-1000G2-M) that I purchased on eBay very affordably.  It is rated for 1000 W and my four solar panels can produce up to a peak of 800 W so I might add two additional panels in the future which shouldn't be a problem for this inverter.

The little blue display above the breaker panel monitors a single 245W solar panel mounted to the south wall of my house.


The inverter has a very helpful color display screen that shows power being generated and also a chart of Watts versus time. This was taken around 9:00am.


I connected this AC circuit to my Emporia energy monitor so I can see live data of the energy being generated in real time.

I did a detailed blog post about the Emporia system I installed back in 2021.  It is a very affordable system that I use to monitor 8 circuits in each of my 2 buildings.  I can track energy flowing in BOTH directions - meaning that solar power shows as "negative" energy in the charts and readings.

Friday, August 1, 2025

Replacing old windows in my workshop with new energy efficient ones


Before and after
Recently I started seeing ads online for replacement windows.  While my home has high-quality Marvin Windows that are double pane, gas-filled, low E very efficient windows my workshop still has the original barn windows whose only purpose was to let light in.  The photo above shows the original window on the left which is entirely made of wood with single pane glass panels.  So I reached out to three different window installer companies to get quotes.

For context, my workshop was originally an open barn built in the early 1990s - so about 35 years old.  When I purchased it in 2001 I converted it into a super insulated very well sealed building using spray in foam and added fiberglass to create R30 walls and R40 roof.  The cheap wood windows have always been the weak point in this building from an energy standpoint but they are also rotting and falling apart so it was time to replace them.

The first company showed up the next day to give me an estimate and they took measurements of all seven windows, 5 on the ground floor and 2 upstairs.  Their first quote was $12,071!  I was stunned!  This was way outside my budget of around $5000 and I told them so.  So I asked them if they could re-quote the job allowing for me to remove all of the trim indoors and outdoors so they could just remove the old windows and put in new ones.  That quote came to $7242, still outside my budget and a big surprise that they could come down that low.  Honestly it struck me as ethically dubious, but still too much for my money.  But these guys kept working the deal like sleazy used car salesman and finally offered another deal of doing three windows for a "mere" $5169.  At this point I got angry and told them to leave.

So then I started researching replacement windows on Lowe's and Home Depot websites and found a window at Lowe's that is a little smaller than the framed opening in my building but, get this - these windows were only $218, so I immediately bought 4 of them because that's all they had in stock at that time (I need 5 for downstairs and 2 upstairs).  These are very high performing windows - see the spec sheet below:

These specs compare favorably with some of the top-of-the-line windows made by Anderson and Marvin.  The whole window is made from vinyl which will never age badly.  


My first step was to remove all the window trim on the outside which was very hard work since the whole building was constructed with BIG nails.  Removing the trim ended up destroying all that wood which was rotting anyway.  Note that I had installed spray foam between the window frame and the window itself because they were huge air gaps there originally.


 The next step was to install flashing tape.  This is 6 inch wide tape with a reflective surface and extremely adhesive rubber that sticks to the walls very well.  After installing a couple of blocking strips I was able to put the window in quite easily: 


I then installed the new window using two screws at the top and two at the bottom per the instructions.  I then put a 2 inch wide strip of flashing tape to bridge the window frame to the building and weatherproof it. 


I purchased some PVC exterior trim and installed it.  Again, this stuff will never rot like the old wood windows and it looks really great!  It's surprisingly expensive but worth every penny.  One piece of 1X8" 8 feet long cost about $50 and I ripped it down the middle and used that for each window.  I caulked around the outside edges of the trim and also at the bottom edge of the window where it meets the trim using very high quality GE silicone caulk.


On the inside.  I forgot to mention that I had to frame the framed opening down to fit the new windows which were 3 inches shorter and 1 inch narrower than the old ones. So I installed a 2 x 8 at the top and bottom and a piece of 3/4" wood on one side to fill in the original framing.


I was able to reuse a lot of the interior wood trim and then paint it.  I also purchased some primed 1X3 for the final trim framing.  These windows look a lot nicer than the original crappy wooden ones which were natural wood and looking very sad.


From an energy efficiency standpoint the original 7 windows were costing me approximately $726 a year in heat loss.  The heat loss through the new windows will be around $147, so I improved the window performance by 500%!  My building is heated primarily with a (self installed MrCool) heat pump that is about 400% efficient.  I back that up with a wood stove when it's very cold outside (meaning below 20°F)  and I have a lot of wood scraps both from the demolition work but also as a woodworker I end up with a large amount of scrap anyway.  I use my wood scraps for kindling and burn about one full cord of hardwood per season.

While it was 4 or 5 hours of hard labor to install these windows, it was worth every penny to do it myself and do it the way I wanted it.  I'm not quite done installing them yet but I think my total cost will be less than $2000.  So in a way I'm paying myself thousands of dollars per hour in labor!

I had some trouble locating windows that would fit the upstairs two windows which are slightly smaller so I emailed the manufacturer (United Window & Door) and asked them if they could make me custom windows.  Their response was immediate and they offered to expedite a custom order for my exact size windows for me once I placed the order through Lowe's.  They also offered to expedite getting one more window for my downstairs.  Great customer service!!

Finally, I stripped out the aluminum side rails from the old windows and took them to a local guy who takes scrap metal for recycling, then I took the old window screen and trim scraps to the dump.


Thursday, July 25, 2024

Emergency solar powered battery generator


Last winter we had a power failure which is something that happens often here in rural Maine due to snow and wind storms, but what was unusual was that my automatic backup generator didn't start.  I went out and tried to manually start it and it wouldn't go.  Turns out the valves were badly out of adjustment.


While I do have a substantial solar power system, it is grid inter-tied which means that it must power down in the event of a power outage so it cannot feed power back into the grid and harm the line workers.  I can't affort a huge whole house battery system like the Tesla Powerwall which would cost over $20,000.


So I was without power for four days, and that was quite tedious to say the least.  I had to keep wood stoves going in both my home and workshop to keep them warm and I was melting snow to flush toilets - and also peeing outside as often as practical.  I did have an old car battery and a 300 W inverter that I could use to power my phone and a few lights, but without Internet I also didn't have any entertainment other than what I could do on my phone.  However, my biggest concern was losing food in my fridge and freezer.


So I purchased a factory reconditioned Ecoflow Delta 2 solar generator for under $600.  This amazing device can put out over 1800W to power AC devices like lights, and my refrigerator.  It also has multiple USB charging jacks.  But more importantly, it can charge from solar, vehicle 12 V power, or AC power from an outlet. 

Since this unit can be charged from solar panels I did a lot of research and found a couple of Eco-Worthy 195W solar panels for about $300 so that I could charge the Ecoflow when the power has failed.  These are bifacial panels meaning that they can gain solar energy from both the front and the back.  In the winter with light reflecting off the snow this can add 15% more power.  Since power outages frequently happen when there is snow on the ground, I figured this was a smart move.
In order to get the solar power into the house, I drilled a hole through the wall and installed a short length of PVC pipe that I can cap on each end. 


I connected the two solar panels together with large hinges so I could fold them together face-to-face.  I then purchased a bunch of aluminum angle and riveted it together to create a tilt stand.


With the panels folded up I can easily move them on a dolly - they weigh over 40 lbs.  So I can store them in my workshop and deploy them easily.


 To connect the solar panels to the generator I purchased a special 12AWG 25FT Solar to XT60i Cable for that purpose.  The orange plug goes into the generator and the black MC4 plugs connect to the solar panels.  I wired the two solar panels in series so one just connects to the other then this cable connects to the other remaining ends.


 This photo shows the generator powering my refrigerator at 269W.  The generator is completely silent and uses lithium iron phosphate batteries that can be deep cycled thousands of times.


I drilled a hole in the floor and ran an extension cord down into the basement, along the basement ceiling, and back up behind the refrigerator which is about 20 feet from the generator.  You can see the cable going down to the floor in the picture on the left.


So now I leave the extension cord plugged into the outlet for normal usage, but when the power fails I simply move it over to the generator, turn on the generator, and then deploy the solar panels.


This system gives me a sense of security because my automatic standby generator is old (1200 hours of run-time) and could fail again in the future.  While this system does not provide enough power for my well pump, it does give me plenty of power to run my fridge, lights, TV system etc.  

In my initial tests at this time of year when there is plenty of sun the solar panels can charge generator in several hours.  Then the generator can run the fridge for over 16 hours each day and I could let it coast for the other few hours since I would not be opening the door at night.  

If there was not sufficient sun, I could always take the generator over to my car and plug it into the accessory outlet to charge it.  My Chevy Bolt EV has over 45 kW of battery-power that I could use sparingly.  My automatic backup generator does not provide power to my charging station, but I could go to a public charging station top off the battery in my car if needed.

If I need more battery capacity, I can purchase an ECOFLOW DELTA 2 1024Wh LiFePO4 Expansion Battery for about $500.  It's about the same size and shape as the generator and sits on top and would double the capacity of the system.

While this system is not cheap, it does provide real peace of mind.  And I could also use the generator to run power tools in locations where there is no power such as up to camp or my backwoods where I might need to run an electric chainsaw.

Monday, April 22, 2024

Removing my old solar augmented heating system

In 2001 my ex-wife and I purchased this property in rural Maine that included an open two-story barn that I converted into a heated and insulated workshop. Moving from California to Maine I was well aware I would need a heating system, but wanted to keep the carbon footprint as low as practical. With that in mind I super insulated the building with a combination of spray in foam and fiberglass resulting in R30 walls and R40 roof insulation.

Original solar collectors in 2003


6 new solar PV panels 2024


I then designed a hydronic heating system that included in-floor heating and radiators upstairs.  The heat source came from a Bosch Aquastar propane heater and 4 large 4 x 8' solar water collectors. I was not particularly impressed with the contribution from the solar collectors and my propane bills were relatively substantial over the years. So a few years later I installed a wood stove as a backup heating system which worked out really well. I now use it whenever the temperatures outside drop below 20°F.  I now purchase about one cord of fire wood per year and augment that with wood that I harvest from my own property and other places.

new solar electric panels installed bottom right

In November 2021 I self installed a MrCool heat pump system designed to heat the entire building using only electricity which is mostly renewable thanks to my substantial solar array and renewably sourced utility electric supply. I then removed the solar collectors and replaced them with six solar panels, you can see a video about this process here

 As part of the removal process, I had a great deal of left over copper pipe that I was able to sell to a recycling company for over $130.  I also sold the four large solar collectors to someone who could make good use of them.


I kept the interior plumbing and heating system thinking that I could use it as a backup.  But in the last few years I have not used it so I decided to decommission it.  The large insulated tank seen in the picture is an 80 gallon water heater used as the solar thermal heat storage tank.  And of course there is a great deal of copper plumbing parts, pressure tank, and the propane boiler.

I took everything apart very carefully so that the copper could be recycled and other parts could be reused.  I literally saved every nut bolt and screw along with wire nuts and every other small component and put them back into my storage system.


There is a local guy who recycles metal as his side hustle, so he came by with his large trailer and hauled off all the parts that could be recycled.  I'm sure he made some good money on all that.


Here is a view of my utility room all cleaned out.  I'm now waiting for the propane utility company to disconnect the line so I can remove the boiler.  I'm hoping to find a buyer for this well used, and well loved Bosch Aquastar unit that is still working great.  The interesting feature about it is that it does not require any electricity to operate so it's optimal for off grid situations.


Here are before and after views of the manifold and PEX plumbing that feeds into the floor.  I left the PEX in place just in case a future owner chooses to install a radiant heating system in the floor.  Here is how I installed the PEX.

As someone who is committed to living sustainably, I am invoking the 4 R's - Reduce, recycle, reuse, repair.  So in addition to scrapping out the metal I also donated some of the useful plumbing parts to the Habitat for Humanity Re-store near me so that someone else can use them.  And I'm also selling some of the more valuable parts such as the pumps on eBay as they are in good usable condition.  All in all, very little went into the trash. 


It was sad to say goodbye to all of this equipment because it took me many, many weeks to design and install back in 2001.  Back then, heat pump systems were not common and very expensive.  What has happened over the intervening years is that solar power system installers are also now installing mini-split heat pump systems because it is a natural pairing.  Heat pumps are very efficient and have the benefit of both heating and cooling.  

While heat pumps are relatively expensive, and installation costs can range from $5000-$10,000, I installed my own heat pump system in the workshop at a cost of less than $2000 and another larger system in my home for less than $2800.