Translate

Monday, April 27, 2015

Replacing the anode rod in my hot water tank to extend its life

Every three to six months I connect a hose to the bottom of my water heater and drain a few gallons into a white bucket to remove gunk and the debris that comes off the sacrificial anode rod as it slowly dissolves. The purpose of this anode rod is that it dissolves through a process of electrolysis, and by doing so prevents the walls of the tank from rusting out.  Today, I decided to replace this anode rod, because when I drained water earlier I was seeing rust in the water which is a danger sign that the walls of the tank may be rusting out.  Here is a picture showing how it is installed in a standard electric water heater tank:
It is clearly visible at the top of the water heater tank as the only large nut on the top. 


Below is a picture of a brand-new rod, and below it what was left of the one that I replaced:
New anode rod
worn out anode rod
Clearly it had done its job, and I am concerned that the walls of my tank may have begun to rust.  I had to borrow a neighbors half inch ratchet wrench, and purchase a 1 1/8 inch socket.  He helped me by bracing the tank while I used the ratchet wrench with a six-foot pipe extension to break loose the old rod.  Fortunately the whole replacement process went fairly easily, all we had to do was shut off the water pressure and drain a little water out of the tank by opening the drain and the P/T valve at the top to allow air to enter before removing and replacing the rod.

This water tank has been in service for six years as my solar hot water storage tank, and another six years prior to that it was my primary source of hot water.  This should serve as a cautionary tale to anyone with a water heater tank.  It is a lot less expensive to replace the anode rod than it is the entire water heater!

Note: due to the low ceiling height clearance, I installed a flexible rod like the one below.  
Generally they are straight and measure 24″ to 36″ long, and some are even longer.  Your anode rod needs to be sized to match your tank.  Here's a link to the one I bought(as an Amazon Affiliate, I earn from qualifying purchases.)

This is part of my ongoing series that deals with the concept of repairing rather than replacing as a way of living sustainably.  One can argue that living sustainably can save you a great deal of money over the long term, and this has certainly been true for my lifestyle.

 NOTE: The tank finally sprang a leak on July 18, 2015 and I replaced it. More about that here.

Wednesday, April 22, 2015

Understanding solar insolation

Having solar power systems on one's home means that you become very conscious of the daily and seasonal cycles of the sun.  The word insolation is used to define the total amount of solar radiation energy received on a given surface area during a given time.  It is insolation that is used to calculate how much energy you can get from solar panels or collectors for any given location and time.

If you live on the equator you do not see significant
seasonal variations in insolation, but where I live at 44° latitude, it varies considerably throughout the year and it is important to understand this in order to correctly predict how much energy one can extract from the sun.

There is a very helpful web calculator produced by PVeducation.org that produces charts of available solar energy (insolation) for given locations.  I use this tool to create the animation below that shows the available solar energy in Watts/square meter in 10 day increments for the year at my location of 44° latitude North.
I made this animation by taking screenshots at ten-day intervals by adjusting the slider on the calculators webpage.

This clearly demonstrates how the available sun hours per day varies significantly at my latitude.  The chart below shows the predicted versus actual solar energy produced by my solar array and clearly shows the seasonal variations.  The predicted energy was charted using the calculator from National Renewable  Energy Labs called PVwatts which takes into account both seasonal variations and local weather conditions.  The actual data came from monthly energy production reports from my solar array. 
Over the years I have added panels to my solar power system which accounts for the annual increase in output.  If you are considering installing solar power or heating systems on your home it is important to be aware of the seasonal variations and the impact of local weather. 

Saturday, April 18, 2015

Repairing - not replacing our microwave oven

Our microwave oven stopped working a few days ago - it made a loud humming sound and produced no heat and smelled a little smoky.   I took this as an opportunity to blog about repairing versus replacing.   This is a recent model Sears Kenmore microwave oven that was only about four years old and sending it to the landfill is just not something I am willing to do.  So I did a web search on the model number and found a number of suppliers that sell spare parts.  I am familiar enough with microwave ovens to know that the most likely component to fail is the cavity magnetron.  This is the large expensive device inside that converts electricity to microwave energy.  (And no, it is not "radioactive"!   Microwave energy is in the radio frequency part of the spectrum).  I found a supplier that listed a replacement part for about $65 plus shipping and it arrived in the mail this morning.


Microwave oven with replacement magnetron
Most home appliance repairs can be accomplished with little more than a screwdriver, and the only challenge in repairing this microwave oven was that the screws on the back required security bits to prevent ill-informed people from opening up the device.   Fortunately, I already had a security bit set with almost every known type of security screw bit.  Sets like this can be purchased for around $10 in a good hardware store.
security bit set
After unplugging it, it was a simple matter to remove the half-dozen screws on the back, and then I found a couple of simple Phillips head screws on the sides.  Manufacturers are tricky and will often mix and match screw types and even hide screws underneath paper or plastic labels to prevent you from figuring out how to open up their products.  It is also important to document everything as you remove parts so that you can remember how to put them back together again.  This is where a smartphone comes in very handy, or any digital camera for that matter.  Also be careful never to force anything when you are taking it apart.  If something does not come loose easily, it is probably due to a hidden screw or fastener.  Slow down and look very carefully for well hidden screws or catches.  When products are manufactured the components are designed to assemble quickly and easily and so dis-assembly should require very little force.

Having removed the cover, it was easy to identify the magnetron inside:
microwave oven inside with replacement magnetron
The magnetron itself was secured with standard Phillips head screws:
magnetron secured with Phillips head screws
After I unplugged the electrical connection, I removed the magnetron and installed the replacement, and buttoned everything up again.  A quick test of the microwave oven with a cup of water proved that it was working perfectly and actually sounds quieter now.  This whole process took less than 30 minutes and anyone with the desire to do it can do this themselves.  

In our disposable economy I realize that I am somewhat heretical in that I firmly believe things should be repaired and not replaced without a thought.  I hope that anyone reading this will consider repairing a broken appliance themselves.  Not only is it very satisfying to repair something, but it also saved over $100 on the replacement cost of a new microwave oven.

If you are on a tight budget and happen to see an appliance that someone has put out with their garbage, you might want to consider it an opportunity to acquire an affordable appliance with a little repair work.  If you are even more enterprising, you could do the repair and then donate the appliance to a worthy cause!  All of this is something to consider in the spirit of keeping things out of the landfill.

Sunday, April 12, 2015

Interior storm windows - thermal study

In an earlier blog post I talked about the benefits of installing interior storm windows to reduce heating bills in cold climates.   You can purchase these double pane plastic film windows for about nine dollars per square foot, or you can make them yourself for around $1.25 per square foot.   Instructions to build them yourself or on my website.   They consist of a wood or metal frame with heat shrink clear plastic on both sides creating a trapped air layer in between.  They fit snugly into the window with highly compressible weatherstripping that prevents air movement through a leaky window.

I have installed these interior storms throughout my workshop because the original windows were cheap, single pane, double hung units that are very leaky.   When I first closed in the building from being an open barn to a heated space I purchased commercial interior storms, and more recently have added my own handmade ones as well.  For every trapped layer of air, an R-value of one is added.  So starting with a single pane of glass, by adding a double pane interior storm there are two trapped air layers creating and R-value of two, and by adding a second interior storm I am upgrading my original windows by an R-value of 4 which is very significant.

Fluke VT04 Visual IR Thermometer
This evening I decided to document the thermal efficacy of these window treatments using my VT04 Visual IR Thermometer made by Fluke.  The temperature outside was almost exactly at freezing and I started by taking a picture of the window with a temperature reading of the glass surface at 31.7°F:
Then I proceeded to take thermal images of the window itself, followed by each of the additional interior storm windows:
By adding my homemade interior storm window I gained 3.6°F and then adding the commercial aluminum framed interior storm window I gained an additional 1.8°F for a total improvement of 5.4°F.  While I adjusted my thermal camera to compensate for the low emissivity of the reflective surfaces, I cannot be sure these readings are entirely accurate, but they certainly convey the concept.

My homemade window is framed with 1X2" primed pine lumber with 3/4" spacing between the panes, while the commercial one is framed in aluminum with only 1/4" between the panes.  Additionally, the air gap between the glass and my window is between one and 2 inches, while the air gap between my window and the commercial one mounted to the surface of the window framing is around 4 inches.  Larger air gaps are less efficient because they can function as a heat pump as cold air flows down at the colder surface and warm air flows up the warm surface creating a circulation.


Saturday, April 11, 2015

Solar collectors and panels explained

I am often surprised when I come across people who are unaware of the difference between a solar panel a.k.a. PV (photovoltaic) panel and a solar collector.  Both types are seen installed on sloping roofs that face south.  (They are never seen on north facing roofs in the northern hemisphere, so if you are lost and see them on a roof you can generally assume they are facing south). So for those who do not know the difference, here is a simple clarification.

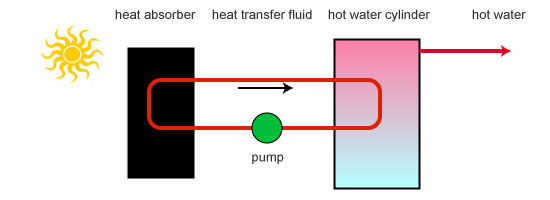
http://www.greenspec.co.uk/building-design/solar-collectors/A solar collector is a device that absorbs heat from the sun which is then used directly or stored in a tank inside the home.  Collectors can be used for both building heating and domestic hot water heating.   Here is a very basic diagram showing how it works.

The principle is similar to leaving a garden hose out on your lawn on a sunny day - the water will come out warm.  Collectors are much more efficient and sophisticated version of this.

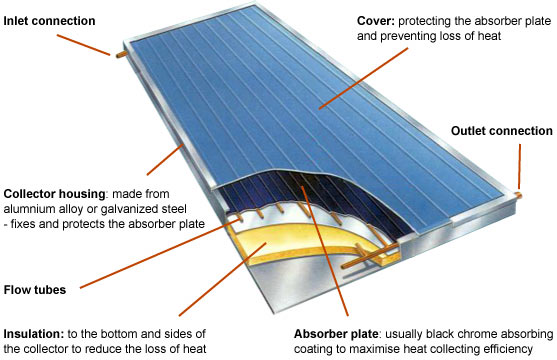
There are essentially two types of collectors.   Flat plate collectors are often confused for solar panels because they are large rectangular devices with glazing on the front.  Inside there are sheets of black metal heat absorber material coupled to copper plumbing.
http://www.greenspec.co.uk/building-design/solar-collectors/

The other type of collector is an evacuated tube collector like this:
These collectors have a heat absorber pipe inside something that is similar to a glass thermos bottle.  Heat is transferred to the plumbing manifold header at the top.  The vacuum glass tube prevents heat loss and improves efficiency.

On my property I use flat plate collectors on my house to heat water, and on my workshop building to heat the building via radiant floor and radiators.   Both systems also use small solar panels to provide electricity for the circulation pumps that pump the antifreeze fluid through the collector to the storage tank.  Due to the lower cost compared to solar electric panels, both of these systems generally have had a much shorter return on investment than solar electric systems.