Translate

Saturday, November 20, 2021


Removing old solar thermal collectors

5 new 375W solar PV panels

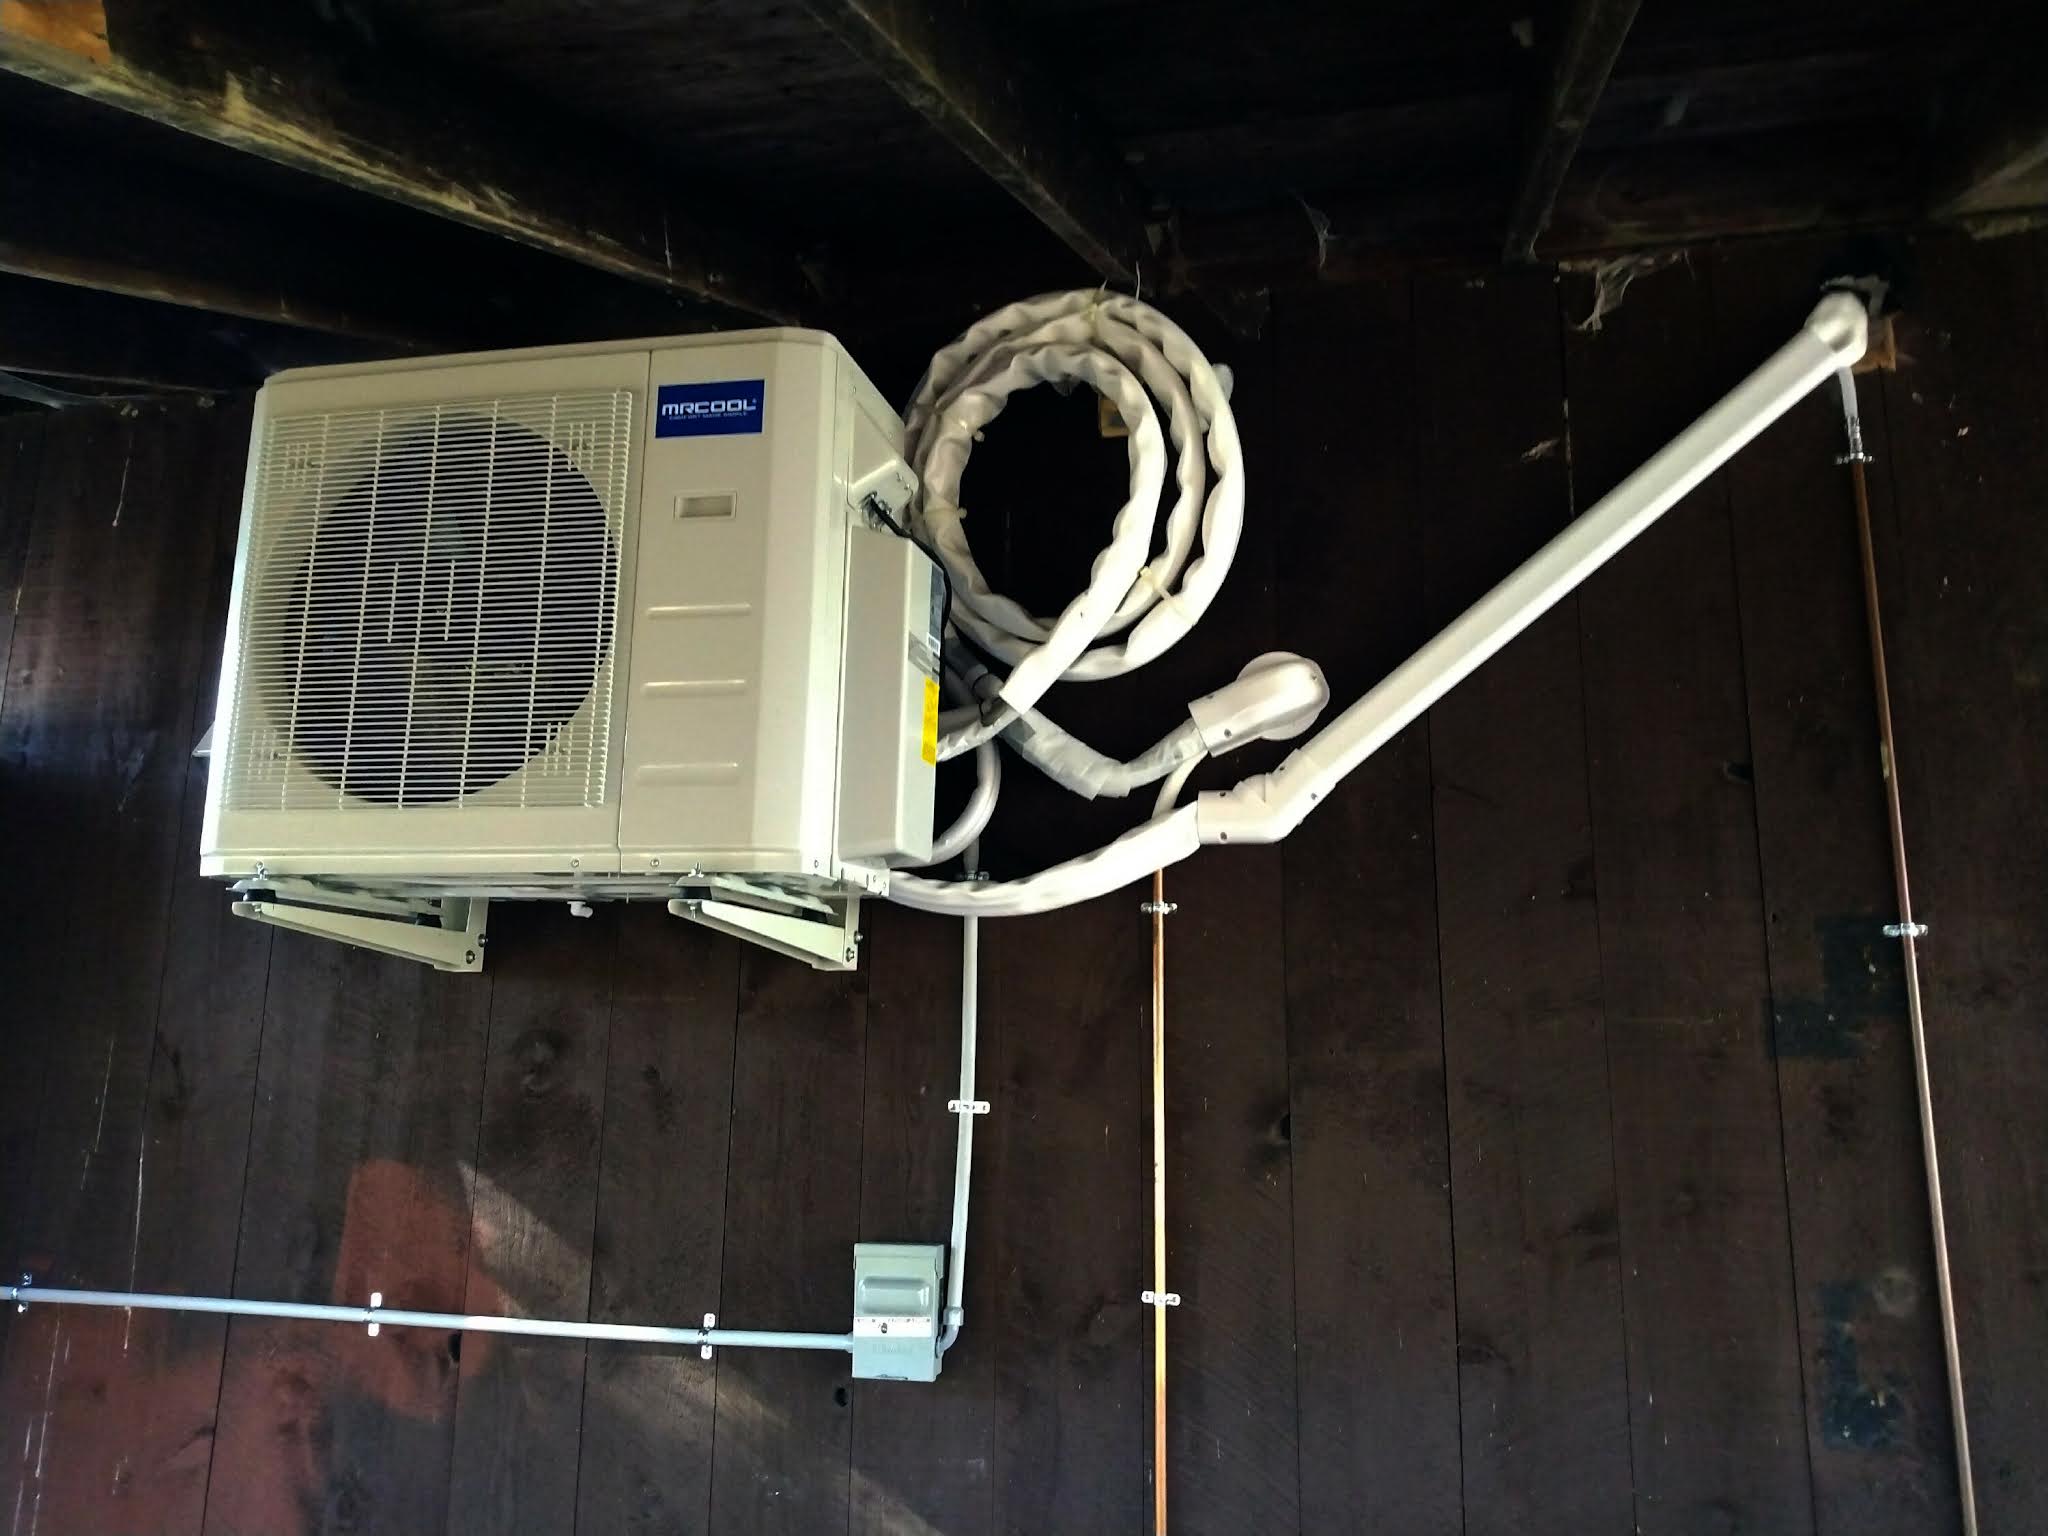
A few weeks ago I completed the DIY installation of a mini split heat pump system in my workshop.  The system essentially replaces the solar heating system I built that used to use four large 4' x 8' solar collectors on the south facing shed roof of my workshop.  

I had installed the solar heating system 20 years ago and it had offset the use of propane over the years.  But that system could not begin to compare with the efficiency of electric heat pumps, and it is my goal to get off of fossil fuel as much as possible. The system used a few hundred gallons of propane last year.  Over the years I had learned to optimize the use of that system which originally used over 800 gallons a year, in the last two years it has been below 300 gallons.  You can see historical records of my propane consumption on this page of my blog.  The problem with fossil fuels is that their prices are unregulated and the cost of a gallon of propane has nearly doubled over the last 20 years.  

The propane tanks will remain in place to feed my automatic standby generator which is a necessity here in rural Maine.  Eventually I hope to replace that with a battery system since I can run that generator up to 7 days cumulatively in any given year due to extended power outages from storms etc.

The new REC brand solar panels are rated at 375 W each with a total theoretical maximum capacity of around 1800 W.  So far, I am seeing a maximum output of a little over 1400 W at noon at this time of year.  I don't have enough energy data for the new heat pumps to know whether this will completely offset the energy required to operate them.  But I am hoping it will.


mounting rails installed

inverter installed

I purchased a complete kit from the altE store in Massachusetts.  I simply called up my account manager, Ben and asked him to spec out a system that could produce close to 2000 W and cost less than $2500.  He specified everything that I would need including every single nut and bolt and it came in at around $2000.  I drove down to Massachusetts (a three hour trip) with my friends pickup truck to get all the equipment.  This includes five brand-new IQ7A micro-inverters made by Enphase.  These are state-of-the-art seventh generation devices that convert the solar panel power to 240 V that feeds right into my building.  (My original system used the M190 model inverter which was their first product over 10 years ago and 8 of those 30 units have failed over the years but were replaced under warranty).

I am so familiar with installing systems like this that I didn't glance at any documentation because it is so simple and plug-and-play for someone with my experience. 
The sequence involves:

  • installing mounting rails
  • mounting the micro inverters to the rails and connecting them to the umbilical
  • running wire from the breaker box to the roof
  • Mounting and connecting the solar panels

What could be simpler!

last year my solar power system provided all the power for my property from June through October. you can see historical statistics of my solar power system here.  I'm hoping these added panels will get me close to net zero.  Time will tell!

Here's a video I made about this whole project:


Sunday, November 7, 2021

I installed another heat pump, this one for my workshop


I have installed a multi-zone heat pump for my workshop.  This was another DIY MrCool installation similar to the one I did for my house back in March except this one is a bit larger and has two interior air handlers, one for my office, and one for my downstairs workshop space.  It also has connections for a third air handler if needed. 

One of the slightly annoying things about these DIY packages is that the line sets that connect the interior to exterior units come in fixed lengths of either 16 feet or 25 feet.  I ended up with far more than I needed which explains why it is all coiled up against the wall next to the unit in the picture above.  It's not the worst thing in the world.  I only needed about 12 inches between the condenser and the interior air handler, and had to coil 16 feet of line outside, I imagine this compromises efficiency slightly, but I'm not too worried about it

I mounted  the condenser high on the wall under my carport.  This will keep it out of the heavy weather and is over 7 feet high so I can park underneath of it.  The installation was relatively simple, I just needed to cut a couple of 4 inch holes through the wall to run the plumbing through and everything else was just mounting parts inside and out.  The instructions are clear and very comprehensive, but having installed one of these already, I barely needed to look at them this time.  

The condenser is very close to my circuit breaker box inside the building so the 240 V wiring was quite short and easy to do.  The only challenging part was getting that huge heavy condenser mounted on the wall brackets.  I borrowed my friends pickup truck and he and I lifted it in stages onto the truck bed and then up onto sawhorses and so on until we got it high enough to lift it onto the mounting bracket.  I actually used the pickup truck as a raised work surface for all of the final connections and wiring, it was really convenient to be at the right height.

Here's a photo of the small air handler in my office which is more than sufficient for this small room and heats it up quite quickly (and also cools it handily in the summer).   

Downstairs in my workshop the large air handler mounts right near my wood stove which is my backup heat source.  

This system cost me almost exactly $3000 in parts and I expect to get a federal tax break of $300 per installed heat pump which is a real plus.  If I had to pay someone to do this insulation it would've cost way more than double what I spent.  Probably over $8000.  While this type of installation is not for the faint of heart, anyone experienced with building construction and wiring should be able to do it without too much trouble.

I have decided to take down the solar thermal heating system that I designed and built 20 years ago since it is no longer needed and is certainly not as efficient as heat pumps are.  In my next post I will show the process of removing the solar collectors and replacing them with 1800 W of solar PV panels which should be more than enough to offset the power consumption of these two new heat pumps.

Saturday, August 28, 2021

Another mini Energy Recovery Ventilator for my home

Back in 2014, I installed a small TwinFresh Comfo Energy Recovery Ventilator (ERV) in my living room at a cost of about $500, and later added one in the master bedroom.  

These ventilators bring in fresh air without losing heat in the winter (and also without losing cool air in the summer).  The main reason for installing these units is that my house is so tightly sealed that there was insufficient air exchange to be healthy.  I determined this after doing a building energy audit that included a blower door test from which I learned that the total leakage area of my entire house was about 122 in.².  This means that the air changes per hour were down less than 3 ACH which is considered the low threshold for healthy indoor air. 

Since then, I have tightened up the house significantly.  This summer I had been noticing how the air in my small bedroom felt stale after I installed the air conditioner in the window and sealed up the other window.  With the door closed, there is no fresh air exchange at all in that room which is why I decided to add an ERV to that room.

These clever units work by removing air from the room and sending it through a honeycomb ceramic heat absorber.  Then the fan then reverses and brings fresh air in that is warmed by the heat absorber.  In my tests, I concluded that these units are about 97% efficient when the outside temperature is around freezing and indoors is in the mid-70s Fahrenheit. 

The ventilators I installed previously cost me around $500 - a search for "TwinFresh Comfo" will find varoius sellers offering prices ranging from $450 to over $700.  

This this time I did some research and found that they are available from Alibaba for significantly less,  I paid $185 plus ocean freight shipping  of about $58 and it arrived about five weeks later.  The unit was well packed and comes with clear instructions and appears to be very well made.

 
Well packed!

 Vitronic product photos:

The Vitonic brand appears to be functionally identical to the more expensive units in almost every detail except for the exterior vent cover.  Actually, the remote control works a great deal better than those other units!

Installation is relatively simple, I just cut a 6" hole in the exterior wall and installed the vent and tube through the wall from the outside and then mounted the interior bracket for the inside unit.


Cutting 6 inch diameter hole inside

Fan unit installed


External vent installed and caulked

There is a three button control panel on the unit itself, but it is the remote control that one generally uses.  This remote is identical to the previous units I had used except that it seems to use radio rather than line of sight infrared which means it has a range of more than 20 feet.  The other remotes only work within a foot or two which was very disappointing.

The remote features include three basic fan speeds: a night mode where the fan automatically drops to the lowest speed when the room is dark and three different airflow options, in, out, and bidirectional (energy recovery mode).  It is helpful to have a vent that can remove air from the room - or bring in fresh air in case of a strong odor.  It also offers three levels of humidity control and I have absolutely no idea how this is accomplished.  But it is this feature that distinguishes an energy recovery ventilator from a heat recovery ventilator and makes it more efficient and usable in humid situations.

I would only recommend installing heat (or energy) recovery ventilators if you are certain that your house is sealed up so tightly that air exchanges and air quality suffer.  The only other option for tightly sealed houses to install an entire heat recovery ventilation system which requires running ducts throughout the house and a large central blower unit that would be typically mounted in the attic or basement.  The cost of this type of system as a retrofit is prohibitive and can result in unsightly ducts everywhere, but it makes more sense when you're building a new home.

Friday, June 25, 2021

my new E-bike

I had given up bicycle riding about 20 years ago when I moved to Maine where the roads all around me are 2-lane blacktop's with cars that whizz past you and the hills were more than I wanted to handle on my old 10 speed.

I recently saw an ad online for an E-bike that intrigued me because the price seemed too good to be true.  I had assumed that all e-bikes started at around $1500 and I've heard that you can spend thousands of dollars on them.  After doing more research I found one that I purchased for $640 which I considered affordable enough.  Including tax and delivery I spent about $750 and have added a number of parts to it including speedometer, blinking safety lights, gel seat pad, water bottle etc.  (Click here to purchase this bike - as an Amazon Associate I earn from qualifying purchases.)

This bike is made by a Chinese company called Ancheer is considered a best buy for affordable yet high quality construction.  While it is quite heavy at 60 pounds it accelerates amazingly well using its 250W motor and 8AH 36 V battery.  I can use either pedal assist mode in three levels of power or full E-bike mode using the throttle much like a motorcycle.  The range is impressive allowing for up to 30 miles in assist mode and 20 miles in full electric mode (all presumably on relatively flat terrain).  It has 26" wheels, front and rear shocks, a Shimano gear set, disc brakes, fenders, and a headlight and beeper.  What more could you ask for!

The other cool thing about this bike is that it folds down quite small so that I can lift it into the back of my Chevy Volt and drive off to fun locations for bike riding:

I have already put over 30 miles on the bike on all kinds of terrain from hilly backroads to extreme off road and could not be happier with it.  The idea of riding 20 miles an hour with very little effort and using the motor to make it easy to climb significant hills is so delightful.  While I am quite fit at age 66, I see no reason to or desire overexert myself if I just want to go for a bike ride.  There is nothing quite like getting on the bike on a hot humid summer day and getting up to speed very quickly - with no effort - but feeling a very delightful cooling breeze at 15-20MPH.

Yesterday my friend and I put both his bike and mine on the bike rack on back of his car and drove up to Camden Harbor here in Maine.  It is a spectacularly beautiful area with relatively quiet back roads.  I had to keep holding the bike back to allow my friend to catch up on his 10 speed.  Often I would zoom to the top of a hill and wait for him at the top.  Here's a view from the top of a small park overlooking Camden Harbor.

And of course all the energy needed to charge the battery comes from my solar power system so it is a 100% green bike.  I get so much joy from riding this bike that I go out as often as I can, and I do get some exercise using it!


Tuesday, May 4, 2021

New cordless electric lawn mower

My original solar lawn mower built in 2005

Back in 2005 I converted my neighbor's dead 22 inch Craftsman gas lawnmower to run on a 12 V electric motor using a deep cycle lead acid battery.  It has lasted 11 years and was crazy powerful.  I have had to replace the battery three times in the intervening years at a cost of about $80 per battery plus a $5 fee or recycling the old battery. Back then there were no cordless electric lawnmowers available and due to my commitment to reducing my carbon footprint, this was the only option I could come up with for mowing my lawn.  That mower was charged from solar panels on my shed roof.  You can read more about the construction of it on my blog here.  At 95 pounds, it is kind of a beast and in the peak of summer summer becomes tiring to push around for 20 minutes - fortunately the battery only lasts 20 minutes or so.

old vs new lawn mowers
 
Over the last several years, almost a dozen companies have introduced cordless electric lawnmowers and last year I started to review them.  The technology has come a long way!  What I find interesting is that there are two newcomers building cordless yard tools, Greenworks and EGO that are both very highly rated.  Cordless lawnmowers are also made by many of the established tool makers like Makita, Black & Decker, etc.  So this spring I did more research and winnowed my choices down to one of those two makes and settled on the Greenworks based on price ($400), size (20" cut width), performance and versatility.

There are several things that are unique about this cordless lawnmower:

  • It has slots for 2 batteries and switches from one to the other when one runs down. (It comes with a 4AH and 2AH batteries).
  • There are inexpensive secondary market batteries available for it with higher capacity than the manufacturer's batteries.
  • Run time with both batteries installed is estimated at about an hour.
  • It has 2 smaller sized blades rather than a single 20" blade.  
  • It weighs about 40 pounds which is much lighter than most gas mowers or my previous one which weighed about 95 pounds.  It is so light that it almost feels like a toy until it cuts through the heavy grass like a champ.
  • It increases its power/speed automatically when it hits heavy grass.
  • Cutting height is set with a single lever.
  • It can be configured either for mulching or a grass catcher on the back.
  • It is almost as quiet as my previous mower, and much quieter than a gas mower.  It has a very high-pitched whine from the dual motors that my neighbor thought sounded like a drone flying overhead until he came by to see it.

old vs new

I have already stripped the old mower for parts.  It turns out that the 3/4HP motor if purchased new today would cost more than the new mower.  So I've listed it on eBay in the hopes that I can sell it for at least half the current retail price.  That big honking gray motor weighs in at 31 pounds so it will be expensive to ship!

The new mower is still solar powered because all of my power comes from solar energy either from my solar panels or the solar farm that I subscribe to.  As Kermit the frog stays: "It's good to be green!"

Sunday, April 25, 2021

My 1st generation Enphase microinverters are failing fast

10 failed microinverters


I was a very early adopter of the Enphase micro-inverter (devices that convert power from solar panels directly to 240 V AC right under the panel on the roof).  I began installing my solar power system in 2009 and added to it over the years to the point that I now have 32 solar panels each with its own micro-inverter.  My installation was the 1239th and there are now literally millions of these micro-inverters in the world.  In the intervening years Enphase have continually revised their products and they are now selling seventh generation microinverters.  Enphase were the pioneers of this technology and remain one of the front runners in the highly competitive field.

To date 10 of these micro-inverters have failed and Enphase have honored their warranty which goes to 15 years. I am now seeing one or more failures every year for the last five years.  The most recent unit to fail is shown in the chart below on the bottom left.  A major advantage of using micro-inverters is that they allow you to monitor each device and its power output in near real time.

Below you can see a recently removed failed device and the new one that looks quite different.  Each new micro-inverter comes with a different set of cable adapters as they evolve the technology and make it backwards compatible with the early models.

Failed, and replacement micro-inverter.

New inverter is smaller lighter and form fits to the components

Every time one of these units fails, I go on to their website and order a replacement - a process that is made quite simple for me as a self installer (rather than end-user).  To replace these inverters, a friend and I need to go up on two ladders, remove the solar panel to access the inverter underneath and then unplug and replace it.  This takes about an hour to do this safely and carefully.

While I am very pleased that the warranty is being honored, I am concerned that I have only four years left on the warranty on some of my older devices and will be left having to buy them at over $200 each when they fail after that.

Sunday, March 28, 2021

DIY install of a Mr Cool heat pump

In March 2021 I received a government stimulus payment of $1400 as part of the Covid-19 recovery.  So I decided to do my civic duty and stimulate the economy by purchasing a DIY Mr. Cool heat pump.  And of course, I am on a mission to reduce my carbon footprint.  I got a very good price from Lowe's of under $1600 for this 240V unit which is rated at 23,000 BTU or 20 SEER for cooling and  25000 BTU for heating (Model: DIY-24-HP-C-230B).  It is rated for 1000 ft.² so it will be sufficient to heat the ground floor of my home which is roughly 27 X 27ft.  It is a split system meaning that it has a condenser outside and an air handler inside connected by wiring and plumbing and can do both air conditioning and heating.  Split heat pumps are known to be very efficient - typically well over 300% efficient, meaning 1000 W of electrical energy gets you over 3000 W of heating or cooling energy.  Yes I know, this sounds like magic, but it's actually just basic physics.

By purchasing the DIY installed unit I am saving over $2000 in markups and installation costs.  Several years ago I got prices from a couple of different local installers that were around $4500.  I did have to buy almost $200 worth of additional parts to complete the installation.  This includes the outside mounting bracket, electrical wire, circuit breaker, outdoor disconnect box, outdoor conduit and a plastic line set cover.  So all in, I'm spending a little over $1800.  It took me many hours of research to identify and select the best prices for all of these components but it was worth it, and I am a geek so this is what I do!

I spent about seven hours doing the actual installation, and if my house had not been built in an unusual way, it would've been a lot easier and faster.  I watched YouTube videos of other people doing installations and some people were able to do it in 4 hours or less. 

Installing line set and mounting bracket

The two biggest challenges were drilling a 3.5" diameter hole through the wall for the plumbing line set, and installing the mounting bracket for the condenser outside.  That hole had to go through 3 2X6 studs and took over an hour to open up!

Here's what the condenser looks like mounted outside my basement door:

and the air handler inside with the remote control:

I made a time lapse video of the installation with subtitles explaining each step:

From studying the energy consumption, I am very disappointed to see that the standby energy use ranges from 37 to 57 Watts.  According to a tech support guy, they need to leave the fan inside running at low speed to continuously sample the temperature for the thermostat.  This is grossly inefficient and there seems to be no way to disable that. 

Since my home, business, and vehicle are largely powered by my self installed solar array, the electricity for this heat pump will come mostly from the sun.  I will keep the Rinnai propane heater in place because heat pumps lose efficiency when temperatures drop below 5°F as they do often here in Maine in winter.  I also use a large wood stove in the basement whenever outside temperatures are below 20°F.  By using up to a cord of locally sourced firewood, I am also reducing my energy needs with a renewable resource.

This Mr. Cool heat pump also comes with a smart phone app and can link to my Amazon echo units so that I can control it by voice by asking Alexa to change the temperature setting etc.  The app lets me set up a schedule of temperatures and also review the history of usage by hours per day.  It has a geo-fencing option that you can use to turn the heat down when you leave home, but since I'm around all the time, I won't be using that.  It also shows a timeline of when settings were changed, all of this really appeals to the geek in me!

Update:  After a few months, I learned that it is best to set a comfortable temperature and leave it there in the winter.  This is more efficient because the system does not have to work hard to make up the difference when the thermostat is set higher.  Although in the summer which is mild here in Maine - I just turn the unit on and off as needed for air conditioning.  These units are MUCH more efficient in AC mode and can cool the room rapidly.

Friday, January 22, 2021

Inconvenient trees


I took this photo of my workshop on January 15 to show the way that the trees on the windrow on the south side of my property have grown to shade my solar collectors and panels.  This windrow forms the border between my property and my neighbors.  When I first moved here in 2001, the trees were only 20 feet or so high, now they are nearly double that and in the dead of winter here in Maine when the sun angle is very low (latitude 43) these trees are becoming more and more obnoxious.  So I asked my neighbor how he would feel about my topping them and he was fine with it.  He had just signed up for getting his electricity from a solar farm and bought a Chevy Bolt electric vehicle, so he is fully on board with renewable energy.

So I put a bow saw over my shoulder and climbed up the trees and aggressively trimmed back the branches that were most actively shading the four large solar collectors that I used to heat the building in the winter.  I was able to gain back about an hour of sun in the afternoon which makes a big difference in offsetting propane needed to heat my workshop building.


This photo was taken after my first pass at topping the trees on the left.  It was taken at around 1:30 PM.  I have two other trees to cut, but I will need help from one of my other neighbors to accomplish those since there is some strategy involved.

Below are charts showing the output from my solar electric panels before and after trimming the trees as shown above.  you can see that the trees had been taking a bite out of my beautiful parabola on clear sunny days!  Definitely some improvement here!


I noticed on my community Facebook group that local people with goats were asking for Christmas trees because goats like to eat them, so I offered the cut branches and a couple of people came and picked them up! 

I had two other options; pile them in the backwoods and let them decompose, or burn them.  But both of these options would release carbon into the atmosphere.  I think it is more environmentally responsible to let goats have them don't you?

Monday, October 26, 2020

Why I buy organic food

 I recently mentioned to a friend that I only buy organic milk.  As a Mainer who is naturally frugal, he didn't understand why I would spend more money for it.  I explained that to me it just tastes better, but I am also voting with my dollars to support organic agriculture.  I also buy certified organic produce both in the supermarket and from local farmers at the farmers market when I can.

I also use the organic milk to make my own yogurt using a small inexpensive yogurt maker.  After finding that Stonyfield is my favorite brand, I simply use that as a starter to make my own which is less expensive and tastes just as good since I am starting from organic milk.  I buy a quart of Stonyfield yogurt a couple of times a year to restart the process.

The O organics brand at the Shaws supermarkets here in Maine is affordable, and I am pleased that this company supports organic products and local farmers.


Saturday, August 29, 2020

243 MPG vehicle - my2017 Chevy Volt!


I have had my 2017 Volt since October 2016 and I just checked my mileage history thanks to VoltStats! (no longer active).  Here's a lifetime chart of electric vs gas driving:

As you can see I have driven over 36000 miles total and only about 5300 miles using gas at about 42MPG.  I drive mostly locally and at low speeds on my rural Maine roads so I stay within the nominal 55 mile electric range 85% of the time.  The 4 cylinder "range extender" gas engine kicks in to power a 50kW generator when the battery gets low and this provides the power to keep the electric drive train going and maintain a minimum battery level.

Since I charge my Volt from my solar panels, it costs almost nothing to drive.  I think I bought about 30 gallons of gas last year - seriously. 

GM have sold over 200,000 of these amazing vehicles, but stopped producing them in March 2020 sadly.  I'm keeping mine indefinitely because it's an amazing vehicle that fits my needs perfectly.  I have heard that some owners already have over 100K miles on theirs with no loss of range and minimal maintenance costs like replacing tires.

They turn up used as off-lease vehicles for a very reasonable $15-17K so that are still a bargain considering the very low operating costs.

I love showing off how FAST this car is, in sport mode it launches like a rocket and burns rubber like a Camaro.  But practically it's nice to have passing power on Maine's 2-lane blacktops.

I also like the roomy hatchback where I can haul all kinds of tools and equipment like my metal detecting stuff (www.guydigsitup.com).  I can fit 8ft. lumber INSIDE the car with the rear seats down!

By the time I need a new vehicle, I hope that most of the ones being sold will be fully electric.  We have to stop the runaway train of the climate crisis before it's too late!  I'm doing my part - how about you?