Translate

Wednesday, April 22, 2015

Understanding solar insolation

Having solar power systems on one's home means that you become very conscious of the daily and seasonal cycles of the sun.  The word insolation is used to define the total amount of solar radiation energy received on a given surface area during a given time.  It is insolation that is used to calculate how much energy you can get from solar panels or collectors for any given location and time.

If you live on the equator you do not see significant
seasonal variations in insolation, but where I live at 44° latitude, it varies considerably throughout the year and it is important to understand this in order to correctly predict how much energy one can extract from the sun.

There is a very helpful web calculator produced by PVeducation.org that produces charts of available solar energy (insolation) for given locations.  I use this tool to create the animation below that shows the available solar energy in Watts/square meter in 10 day increments for the year at my location of 44° latitude North.
I made this animation by taking screenshots at ten-day intervals by adjusting the slider on the calculators webpage.

This clearly demonstrates how the available sun hours per day varies significantly at my latitude.  The chart below shows the predicted versus actual solar energy produced by my solar array and clearly shows the seasonal variations.  The predicted energy was charted using the calculator from National Renewable  Energy Labs called PVwatts which takes into account both seasonal variations and local weather conditions.  The actual data came from monthly energy production reports from my solar array. 
Over the years I have added panels to my solar power system which accounts for the annual increase in output.  If you are considering installing solar power or heating systems on your home it is important to be aware of the seasonal variations and the impact of local weather. 

Saturday, April 18, 2015

Repairing - not replacing our microwave oven

Our microwave oven stopped working a few days ago - it made a loud humming sound and produced no heat and smelled a little smoky.   I took this as an opportunity to blog about repairing versus replacing.   This is a recent model Sears Kenmore microwave oven that was only about four years old and sending it to the landfill is just not something I am willing to do.  So I did a web search on the model number and found a number of suppliers that sell spare parts.  I am familiar enough with microwave ovens to know that the most likely component to fail is the cavity magnetron.  This is the large expensive device inside that converts electricity to microwave energy.  (And no, it is not "radioactive"!   Microwave energy is in the radio frequency part of the spectrum).  I found a supplier that listed a replacement part for about $65 plus shipping and it arrived in the mail this morning.


Microwave oven with replacement magnetron
Most home appliance repairs can be accomplished with little more than a screwdriver, and the only challenge in repairing this microwave oven was that the screws on the back required security bits to prevent ill-informed people from opening up the device.   Fortunately, I already had a security bit set with almost every known type of security screw bit.  Sets like this can be purchased for around $10 in a good hardware store.
security bit set
After unplugging it, it was a simple matter to remove the half-dozen screws on the back, and then I found a couple of simple Phillips head screws on the sides.  Manufacturers are tricky and will often mix and match screw types and even hide screws underneath paper or plastic labels to prevent you from figuring out how to open up their products.  It is also important to document everything as you remove parts so that you can remember how to put them back together again.  This is where a smartphone comes in very handy, or any digital camera for that matter.  Also be careful never to force anything when you are taking it apart.  If something does not come loose easily, it is probably due to a hidden screw or fastener.  Slow down and look very carefully for well hidden screws or catches.  When products are manufactured the components are designed to assemble quickly and easily and so dis-assembly should require very little force.

Having removed the cover, it was easy to identify the magnetron inside:
microwave oven inside with replacement magnetron
The magnetron itself was secured with standard Phillips head screws:
magnetron secured with Phillips head screws
After I unplugged the electrical connection, I removed the magnetron and installed the replacement, and buttoned everything up again.  A quick test of the microwave oven with a cup of water proved that it was working perfectly and actually sounds quieter now.  This whole process took less than 30 minutes and anyone with the desire to do it can do this themselves.  

In our disposable economy I realize that I am somewhat heretical in that I firmly believe things should be repaired and not replaced without a thought.  I hope that anyone reading this will consider repairing a broken appliance themselves.  Not only is it very satisfying to repair something, but it also saved over $100 on the replacement cost of a new microwave oven.

If you are on a tight budget and happen to see an appliance that someone has put out with their garbage, you might want to consider it an opportunity to acquire an affordable appliance with a little repair work.  If you are even more enterprising, you could do the repair and then donate the appliance to a worthy cause!  All of this is something to consider in the spirit of keeping things out of the landfill.

Sunday, April 12, 2015

Interior storm windows - thermal study

In an earlier blog post I talked about the benefits of installing interior storm windows to reduce heating bills in cold climates.   You can purchase these double pane plastic film windows for about nine dollars per square foot, or you can make them yourself for around $1.25 per square foot.   Instructions to build them yourself or on my website.   They consist of a wood or metal frame with heat shrink clear plastic on both sides creating a trapped air layer in between.  They fit snugly into the window with highly compressible weatherstripping that prevents air movement through a leaky window.

I have installed these interior storms throughout my workshop because the original windows were cheap, single pane, double hung units that are very leaky.   When I first closed in the building from being an open barn to a heated space I purchased commercial interior storms, and more recently have added my own handmade ones as well.  For every trapped layer of air, an R-value of one is added.  So starting with a single pane of glass, by adding a double pane interior storm there are two trapped air layers creating and R-value of two, and by adding a second interior storm I am upgrading my original windows by an R-value of 4 which is very significant.

Fluke VT04 Visual IR Thermometer
This evening I decided to document the thermal efficacy of these window treatments using my VT04 Visual IR Thermometer made by Fluke.  The temperature outside was almost exactly at freezing and I started by taking a picture of the window with a temperature reading of the glass surface at 31.7°F:
Then I proceeded to take thermal images of the window itself, followed by each of the additional interior storm windows:
By adding my homemade interior storm window I gained 3.6°F and then adding the commercial aluminum framed interior storm window I gained an additional 1.8°F for a total improvement of 5.4°F.  While I adjusted my thermal camera to compensate for the low emissivity of the reflective surfaces, I cannot be sure these readings are entirely accurate, but they certainly convey the concept.

My homemade window is framed with 1X2" primed pine lumber with 3/4" spacing between the panes, while the commercial one is framed in aluminum with only 1/4" between the panes.  Additionally, the air gap between the glass and my window is between one and 2 inches, while the air gap between my window and the commercial one mounted to the surface of the window framing is around 4 inches.  Larger air gaps are less efficient because they can function as a heat pump as cold air flows down at the colder surface and warm air flows up the warm surface creating a circulation.


Saturday, April 11, 2015

Solar collectors and panels explained

I am often surprised when I come across people who are unaware of the difference between a solar panel a.k.a. PV (photovoltaic) panel and a solar collector.  Both types are seen installed on sloping roofs that face south.  (They are never seen on north facing roofs in the northern hemisphere, so if you are lost and see them on a roof you can generally assume they are facing south). So for those who do not know the difference, here is a simple clarification.

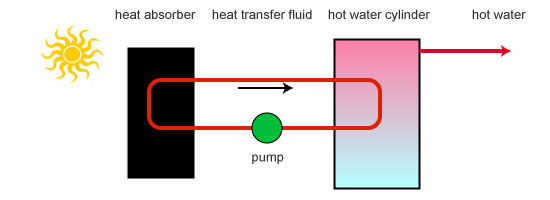
http://www.greenspec.co.uk/building-design/solar-collectors/A solar collector is a device that absorbs heat from the sun which is then used directly or stored in a tank inside the home.  Collectors can be used for both building heating and domestic hot water heating.   Here is a very basic diagram showing how it works.

The principle is similar to leaving a garden hose out on your lawn on a sunny day - the water will come out warm.  Collectors are much more efficient and sophisticated version of this.

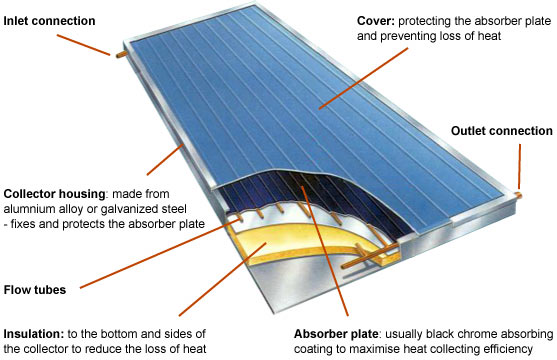
There are essentially two types of collectors.   Flat plate collectors are often confused for solar panels because they are large rectangular devices with glazing on the front.  Inside there are sheets of black metal heat absorber material coupled to copper plumbing.
http://www.greenspec.co.uk/building-design/solar-collectors/

The other type of collector is an evacuated tube collector like this:
These collectors have a heat absorber pipe inside something that is similar to a glass thermos bottle.  Heat is transferred to the plumbing manifold header at the top.  The vacuum glass tube prevents heat loss and improves efficiency.

On my property I use flat plate collectors on my house to heat water, and on my workshop building to heat the building via radiant floor and radiators.   Both systems also use small solar panels to provide electricity for the circulation pumps that pump the antifreeze fluid through the collector to the storage tank.  Due to the lower cost compared to solar electric panels, both of these systems generally have had a much shorter return on investment than solar electric systems.

Saturday, March 28, 2015

How I eliminated junk mail


Several years ago, I decided to tackle my junk mail issue. My mailbox was filled with catalogs and other junk mail every day and I realize this amounted to an enormous amount of waste despite the fact that I recycled everything.   The idea of cutting down trees, printing catalogs and mailing them to a recipient who immediately disposes of them is the epitome of an unsustainable reality and I wanted no part of it.

I took several approaches to eliminating junk mail.   First, I subscribed to the TrustedID - one of several direct mail preference services and entered my preferences on their website.  This organization effectively handles the rest for you, here is what they say on their webpage:
We act on your behalf to protect your consumer rights and get your opt-outs processed. You can keep track of your opt-outs, and if you receive the mail again, we will follow up. We work with over 8,000 companies — and the largest data brokers — to honor your choices and protect your privacy. We have processed over 25 million opt-outs by over 1.7 million account holders. 

The direct mail industry also offers another option known as the National Do Not Mail List.  Both are good examples of an industry policing themselves in order to reduce their own costs.   Here is how they explain their service:
As direct marketers ourselves, we know that mail-order companies don't want to waste their money sending mail to people who don't want to receive it.

They'll gladly take your name off their lists when they're asked to do so. But with countless mail-order companies doing business today, you just can't contact enough of them on your own to make a difference. The postage alone would cost a fortune!


A similar option is available from DMAchoice.org  which also offers an option for reducing junk email.

Incidentally, if you have not already signed up with the National Do Not Call Registry - a service of the Federal Trade Commission, you can reduce the number of telemarketing phone calls that way.  I have signed up for that service, but still get solicitation phone calls.  The way to eliminate these is to refer to their caller ID and call them back, many of them offer an option of "press 1 to be removed from our calling list", and if not some of them will connect to an actual person who will remove you from their list if you ask nicely.  I feel that is important to be polite when asking to be removed - the person you are talking to is not the bad guy here, just an employee.

Finally, when all else fails I made a simple rubber stamp that prints the following:

please remove
from your mailing list
thanks


Of course you can also write this on their subscription form. This is particularly useful when they provide you with a postage free return envelope.  All I do is remove the return section, stamp it next to my address and stick it in their envelope.  They get the message eventually!

I also reduce mail in general by paying all my bills electronically either through direct debit or paying through the company's web portal. 

At this point I can honestly say that I rarely get any junk mail whatsoever.  I still do get a few catalogs and mailings from companies I do business with.

According to another junk mail reducing web site: www.41pounds.org: "The average adult receives 41 pounds of junk mail each year of which 44% goes to the landfill unopened" (or hopefully it is recycled).  They have more statistics that make the idea of reducing this waste very compelling.  They have a $35.00 one-time fee and use $10 to support effective non-profits like Habitat for Humanity.


If more of us took this simple action, we could have a significant impact.

On a slightly different topic, I have also subscribed to Incogni - a service that removes all of your personal information from the Internet.  From their website:
Data brokers collect your personal information and profit off it at the expense of your privacy. Let Incogni help you take back control of your data, reduce spam, and prevent scam attacks by opting you out of their databases automatically.
A one month or two months subscription should take care of everything, just be sure to cancel your subscription after two months.  After this it is largely unnecessary.

Thursday, March 26, 2015

Conserving water with a circulation pump

Like many houses, our master bathroom is at the far end of the house from the water heater.  A total of about 45 feet of copper pipe that must be heated before hot water arrives at the faucet.  This takes from 80 seconds in the summer to over 2 minutes in the winter, and wastes a lot of water and energy used to heat it.  When I learned about a clever pump made by ACT, Inc., I decided to install it right away.

The principle is that a pump is installed under the sink that pulls hot water up to the pump, and returns it back down the cold water pipe to the water heater at the press of a button.  The 54 Watt pump shuts off as soon as sufficiently hot water is present.  Each time you need hot water you just press a button and wait half a minute while the water is sent back to the water heater tank instead of down the drain.  The pump shuts off at a pre-set temperature.


This system differs from other designs that constantly circulate hot water through the plumbing to keep it available at all the faucets constantly.  I don't  recommend that type of system as it actually wastes energy, both at the pump and due to radiated heat loss from the plumbing which acts as a defacto radiator in the walls of your house.

The D'Mand system reduces waste and saves energy in 3 ways:

  • reduces the use of our 1500 Watt 240Volt  well pump.
  • reduces the need to heat water that would just go to waste down the drain.
  • reduces waste water entering our septic system.
The only drawback is that the pump requires electricity under the sink, which requires wiring in a new (GFCI protected) outlet in most cases.  The basic pump and controls sell for about $400, plus some plumbing parts.  So the installed parts cost was around $500.

The installation of the pump is quite simple.  After shutting off the water supply and draining the lines to the sink, the faucet shut offs are removed.  A tee is inserted, and the shut-off is replaced.  Then the 2 flexible lines to the pump are installed onto the new tee thread.  This took me about 20 minutes.


I am an experienced plumber so I had no trouble installing the pump.  Any plumber would also find this a simple installation.

The challenging part is that an electric outlet is required under the sink.  The nearest outlet in our bathroom is off to the right.  So I made a run to the hardware store to get a bunch of Wiremold (surface wiring conduit) parts.  Then I added a breakout box on top of the existing outlet and ran Wiremold channel across and down into the space under the sink where I installed a new outlet for the pump.  This part took over 3 hours!
 
I also made an attractive circular white acrylic switch plate, and used a stainless steel push button.
Once the button is pressed the pump turns on immediately and shuts off automatically as soon as it senses hot water at the pump.  This saves several gallons of water that would otherwise run down the drain, and reduces the usage of our tankless water heater.  In our home the cold line returns to the bottom our solar storage tank where the sun heats it up for free.

Before the pump was installed it would take 80 seconds for the hot water to arrive, now the pump brings it up in about 50 seconds after pressing the button, and the water runs hot from the faucet within a few seconds.  They also make a motion sensor that will turn the pump on automatically when you enter the bathroom (or kitchen).  Here is the accessories page.

This system is relatively expensive and I don't expect a payback any time soon.  This is something I did as part of my commitment to living sustainably using technology.  I admit it may not be for everyone.


Monday, March 23, 2015

Reviewing our renewable energy and efficiency investments.

Since my ex-wife and I purchased our home in Maine in 2001 I have been working at reducing our energy footprint as part of my commitment to live as sustainably as practical.  My strategy has been to reduce use of fossil fuel by improving things like building insulation and increasing efficiency in general. But also I have added renewable energy sources such as a solar heating system for the hot water in our home and the 5.8 kW solar array I installed, and the solar augmented heating system for my workshop.  I decided to review my progress so far since I have extensive data on all of our energy sources and costs.  This information is derived mostly from our utility bills.


We use propane to heat the house and also for cooking, clothes drying, and water heating.  The chart below shows our annualized usage and cost for propane per heating season.  As you can see we have reduced our use of propane by about 50% over the years.  The biggest impact was the solar water heating system installed in 2006.


Not factored into our relatively low propane costs is the fact that we burn up to 2 cords of firewood per year at a cost ranging from $300-$500 per year. In 2014 we spent $425 for firewood which brings our recent total heating cost to a little over $1400 which is less than half the Maine state average for home heating costs. 

Some of the things responsible for our diminishing usage are:
I built a solar augmented heating system for my super insulated 1260 sq.ft.workshop in 2001.  Since then I have reduced the use of propane to heat the building by 75% by lowering the thermostats and transitioning to burning (renewable) firewood that I mostly cut from my own 2.5 acre lot. 

Thanks to the solar power system I installed, our average electric bill would be around $10 if we did not have the Chevy Volt electric vehicle which adds approximately $45 per month to our monthly bill.


The $45 average monthly electric cost to charge the Chevy Volt is reducing our gasoline usage by about 26 gallons for that vehicle since we drive in electric mode about 60% of the time.  (The remaining 40% are driven in “range extender” mode at approximately 40 mpg.)  And since a large percentage of the charging power for the Volt comes from our solar array in the summer, we are driving for largely free and carbon neutral during those months.

One can look at all of the investments I have made in reducing our energy footprint in terms of return on investment. In actual dollars most of these investments have already paid for themselves, such as the solar hot water heating system I installed in 2006 which according to my calculations paid for itself in approximately 4.5 years and will save us an estimated $11,000 over 25 years:

 
In general investing in renewable energy yields a better return than investing in the stock market. Even my relatively expensive solar power installation that has cost me over $25,000 will pay for itself within 16 or 18 years (accounting for federal and state incentives) assuming it had been financed at below 5% interest.  Since I have already paid off that system, the energy savings is all pure profit at this point.

Monday, March 16, 2015

Garbage and recycling

My small town in rural Maine has a population of less than 3000 people and a few years ago we instituted a zero sort recycling pickup.  Prior to that all recycling had to be sorted and taken to a series of containers at the town office and only a few stalwart citizens made use of this system which was cumbersome.  It was particularly challenging during the heavy Maine winters.  Now we put out a single bin of mixed recyclables every two weeks, while our regular trash is picked up weekly.  Residents have been slow to commit to the recycling plan and in 2014 the numbers were not very encouraging.  922.8 tons were sent to either landfill or waste to energy facilities, while only 217.5 tons of recyclables were sent to a sort facility.  While we are charged for garbage and recycling pickup, there is no tipping fee (based on tonnage) for the recyclable pickup.  So you would think the town residents would see the incentive to recycle since it would reduce our local property taxes.

Being someone who is very committed to sustainability, my waste and recycling stream is minimal but I decided to measure my garbage and recycling output to see how well I am doing.  Before I take the bins to the curb I weigh them and subtract the weight of the container to get the net weight and enter it into a spreadsheet from which I can extract this chart:
chart will be updated weekly throughout the year

Not documented are redeemable cans and bottles (we get 5 cents each in Maine), but this amounts to only a few ounces a week.  Also I pick up roadside trash around my neighborhood in a 1/2 mile radius and that adds a pound or so a week of recyclables, redeemables and trash.

Throughout the winter my I recycle less paper and cardboard because I use those materials as kindling for my 2 wood stoves, so my numbers are a bit low to start with.  Most of what ends up in the garbage is food packaging and some office waste. 

Occasionally I dispose of some broken piece of equipment, but I usually strip out any parts that I can use before it goes in the garbage.  Larger electronic devices such as computer printers are taken to the local electronics store to be recycled rather than trashed.  And rechargeable batteries and old CF lamps go to the local drop-off bins in Lowe's hardware store.  Bulky thinks like old appliances or furniture are delivered to the land fill - but this happens very rarely.

I am pleased to see that I am averaging around 60-70% recycling to 30-40% trash.  Given the very small amount of actual materials I dispose of, all it will take is one large heavy item to skew the statistics.  So it will be interesting to see how I average out at the end of the year.
For reference the EPA says an average American: "...recycled and composted 1.51 pounds of our individual waste generation of 4.38 pounds per person per day.My weekly average so far is about 1/3 of that.  I do see a few neighbors that put out three or four garbage pails per week and very little in their recycling bins and it is hard for me to understand how a family can create that much garbage.  Our local landfill was supposed to have been closed a year or two ago but they somehow found more room to keep building a mountain of garbage there.  Maine is slowly moving toward a more sustainable waste stream with a number of waste to energy plants and biomass to energy plants for organic waste. 

The thing about garbage is once it leaves the curb most people do not think about it whereas I personally have visited both the local garbage dump and the recycling sorting facility that processes our recycling.  Both places are quite amazing.  The technology for sorting recyclables is so efficient that less than 1% comes out at the other end as garbage and this is mostly due to people putting things into the recycling bins that don't belong there due to ignorance or laziness.  


Zero sort recycling plant separating materials
Recycling plants operate at a profit and every month bidders show up to make offers on the spot market for all of the recycled materials.  One thing I learned from a tour of the plant was that all of the glass gets crushed into a single pile of mixed brown, green, and clear.  This is sold to the nearby Coors bottling plant because the average net color is quite close to the light brown color that they use for their bottles.  Here is an excellent video showing how the materials are sorted at the plant that processes our recyclables.

Here is my chart from 2015, the numbers are a little higher until October when my ex-wife moved out:


Saturday, March 7, 2015

Solar panel seasonal tracking

My workshop with solar arrays
A couple of years ago after I had installed my west facing solar array, I realized there was still some space above my south facing solar collectors that are used to heat the building.  So I decided to install two additional 245W panels.  Each panel feeds an Enphase microinverter that converts the DC solar power to 240VAC that feeds into the main breaker panel.

Solar panels perform optimally when they are pointed directly at the sun and their energy output drops significantly when they are off by as much as 20°.   Since the sun elevation changes from 42° in the winter to 66° in the summer here in Maine (a change of 42°) I felt it would be wise to engineer the panels to track the seasonal changes.

I researched DC linear actuators and found one that had a 24 inch stroke, this means that it could change length from 28 inches to 52 inches.  This would allow me to lower the panel to meet the lowest sun angle in the winter and raise it relatively close to the 66° summer elevation angle.  I am more concerned with optimizing winter power since the days are so much shorter.
Progressive Automations PA-14
I used Google SketchUp to optimize the geometry of the installation.
In order to get the panels to accurately track the sun's position, I designed a servo control system (here is my schematic) and connected it to a timer that activates the electronics several times a day for a minute.  Here is a photo showing the timer mounted above my handmade control panel that allows me to operate it in automatic or manual modes.
Moving the panels in manual override
I designed a solar tracking sensor and built it into a small red plastic dome.  There are two small photocells mounted above and below a black painted metal divider.  When the sun shines unequally on the two sensors a signal is sent to my controller to move the motor until the brightness is equal on both sensors.
Sun tracking sensor with 2 photocells
It is early March now and the actuators are approaching their maximum extension in order to catch the higher angle of the sun.  Due to limitations of the length of throw of the actuators, they only actively track the sun from the fall solstice through the winter until the spring solstice.  This improves performance during the shortest solar days in the year.
Solar panels with linear actuators extended part way
To be honest, I am not sure how much more energy I am gaining by tracking the seasonal solar elevation changes, but it was a lot of fun to engineer this project.  I am reminded that this system is working because the linear actuators are loud enough that I can hear them when they move.  The timer is programmed to activate the system at noon and 2:00pm for a minute every day.


Thursday, March 5, 2015

Adventures in EV charging

2012 Chevy Volt

When I purchased my 2012 Chevy Volt, I was aware that it came with its own charging cable that could plug into any regular 120 V outlet, but it would take almost 9 hours to fully charge the vehicle.  Faster Level II chargers could reduce the full charge time to below 4 hours.

Since I wanted to track energy usage for charging the vehicle, I pulled some heavy wire (Romex 10/3) from a 20Amp 240V breaker out to the front of the building and installed a separate Watt meter that I found on eBay, and installed a 120V outlet below it to start with.  (I read the meter weekly and post results to a chart on my web page.)
Me installing Watt meter
With an EV range of 27 to 38 miles, I thought it would be convenient to install a 240V Level II charging station that could charge the vehicle in less than four hours so that I could make several long trips in a single day if needed.  In doing my research I found that most charging stations available sold for over $1000 and up into the several thousands not including installation.  But I found that GM was subsidizing a charging station made by Bosch called the Voltec SPX, and I purchased one for around $500.  Being an electrical engineer and DIY inclined, I installed the charging station myself.  I have learned that if you hire a contractor to do this it can cost anywhere from $300 to almost $2000 depending on how much wire they need to pull for this job.  

The installation was relatively simple:
Voltec SPX charging station and Watt meter
At the time I considered this charging station to be a piece of competent German engineering with a good balance of form and function.  The round shape allows you to hang the coiled charging cord onto it for storage and it appeared to work just fine.

The trouble began 11 months later just before the charging station went out of warranty.  It stopped working and showed a red indicator light.  So I returned it to Bosch and they sent a replacement.  When it failed again a few weeks later I decided to open it up and have a look inside.   What I found was that the engineer who had designed this charging station had installed fuses on the circuit board that were soldered into the board making them completely un-replaceable to your average consumer.  However, as an electrical engineer it was relatively simple for me to remove and replace those blown 15 amp fuses with ones rated for 20A.  The original fuses were rather conservatively rated since the Chevy Volt draws just below 15A per leg of the 240V line.   In retrospect I think that my 240V table saw creates power surges that more than likely caused these fuses to blow.   Here is a close-up of the circuit board inside the charging station:
Fuses in Voltec SPX charging station
I became quite irritated when my replacement fuses blew a few weeks later since it is a pain to open up the charger.  So I installed 2 small 20A circuit breakers on pigtails and sited them where I could reset them from the outside:
2 - 20A circuit breakers added to Voltec SPX charging station
This fix worked, and I was able to re-set the breakers every so often when they tripped.  But a few weeks ago the charger stopped working and displayed an ominous blinking red idiot light.  This time I had had it!  So I went back to charging from a 120V outlet using the Volt charger that came with the vehicle while I researched affordable options. 
Chevy Volt charger
What I found was an affordable open source EV charging station made by Electric Motor Werks Inc. in California.  These guys had developed their product with a Kickstarter campaign in July 2013 and now had a well-designed product on the market that I was able to purchase for under $500.  This clever design is based on the popular Arduino microcontroller and it contains a very basic 240V relay for transferring power to the vehicle.  It is built into a plain-vanilla sealed metal box that can be mounted indoors or outdoors.

I decided to install the charger inside and reuse the charger cable and plug from the original charging station.  Here it is installed inside behind the Watt meter:
JuiceBox charging station
I installed a small green light on the side of the box so I could tell when the charging station was providing power to my vehicle at a glance.

In addition to reusing the original coiled charging cord and plug, I also took the plug holder out of the old charging station and mounted it to the wall under my carport.  This allows me to charge and store the connector in 2 locations which is convenient.

Charge plug holder
This new setup works perfectly and I am pleased to own a piece of open source hardware that I know that I can fix or upgrade myself in the future should it be necessary.  I did require some tech support via email during the installation, and found the guys at Electric Motor Werks Inc. to be very responsive, friendly and helpful.

Here is my Volt being charged under the carport, and you can see the other charge plug storage location below and to the right of the Watt meter out front where I often charge the vehicle in good weather.  I also put a 120V outlet on the left of the meter box for the Volt Charger.
Chevy Volt charging under car port
Volt charging from JuiceBox (hidden inside building)

I hate to throw things in the garbage, so I am stripping out all of the parts that I can salvage from the original Voltec charging station including the circuit breakers I added, terminal strips, ribbon cable and even some screws.

Voltec SPX inside - mostly scrap.
Oh, did I mention that my Volt is charged from our 5.6kW solar array?  This means I am driving for free with zero carbon emissions for local driving most of the year.  More info can be found on my Chevy Volt web page.