Translate

Showing posts sorted by date for query panel. Sort by relevance Show all posts

Friday, November 21, 2025

Adding 2 440W solar panels


4 195W and 2 440W panels

After I set up my new ground mounted solar array recently (4 195W panels) I realized that I was only getting peak power of around 350W, so I decided to order a couple more 240 W panels from Amazon.  When they arrived (in a cardboard box weighing almost 80 pounds!) one of them was damaged beyond repair so I sent them back and then started looking online for solar dealers here in Maine.  I was surprised and delighted to find a company called Greentech Renewables that had just opened up a huge warehouse a few months ago.  They are about 15 minutes from my home so I stopped by and talked to their salesperson Eric who was very friendly.  I told him I was looking for a couple of high power solar panels around 450 W and he said he had quite a number of them.  So I asked him what the dollars per Watt was for these panels and he said that they were about $0.35.  Wow!  When I installed my first 20 panels 16 years ago the cost was over $3.50 per Watt, prices have really come down!  And the icing on the cake is that these panels were assembled in the USA by Canadian Solar, so no tariffs involved!  

So I paid for them and said I would come back in an hour or two with my trailer to pick them up.  I didn't realize how big these panels would be until I got there.  They are almost 4 x 6' and required two people to move them.  They put 2 on a shipping pallet and fork lifted them onto my trailer.  I asked if I could keep the pallet which is constructed from fresh clean looking 2X6 lumber and they said "Sure!".  So I cut them up with my chainsaw and I'm using the wood to heat my workshop:


I then went to my local metal supplier and purchased some angle aluminum so I could construct a hinged mount that I bolted right on to the back of the 2 new panels.  The metal strip on the bottom is secured to the ground with tent pegs so they can't blow over.  Of course I will need to shovel snow away from the front of them in the winter, but that's a small price to pay and I do have a snowblower.

  
UPDATE!  In mid December an unusual southerly wind storm with gusts over 40MPH blew them all over.  Fortunately they were not damaged.  Solar panels are very strong - like automobile windows.  I fixed broken mounts and secured them with 18" screw ground anchors that I got from Harbor Freight.

Here's the front view of the full solar array with the newest panels on the right: 

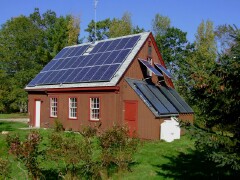
You can also see the solar thermal solar collectors that are used to heat the hot water in my house and a 250 W solar panel that also works as a sunshade for the second floor bedroom.

Wiring for this array was complicated.  In order to optimize power there are two pairs on the left wired in series and the large ones on the right are wired in parallel and then they all combined in parallel to feed into the inverter.  Since the panels are different voltages, the power defaults to the lowest voltage which is a compromise, but so far it's working okay.

According to my calculations they should be producing peak power of 1000 W, but in reality it peaks a 960W.  The screenshot below shows the energy produced for the last several days.  Day one was the original four panels panels, day two I added the first of two 440 W panels, and then on day three I connected the second 441 panel.  As you can see I'm offsetting my electric bill by about 3.6 kWh per day which will really add up.

The main reason reason for my adding these panels is that my annual cost of electricity is about $1000.  This is largely due to the two heat pumps and my electric vehicle and I'm slowly working my way towards a zero electric bill.  Next year I'm considering replacing the 29 panels on my workshop with newer much higher power panels.  This should get me to a net energy of zero.  

The other thing affecting my electric bill is that the utility company has been slowly ramping up a surcharge for those of us with solar.  Years ago there was no surcharge, then it went to $22 and now about $44 per month which adds up to $528 per year.  I understand the reasoning, because they have no revenue from me to support the infrastructure, but $44 seems egregious considering that my solar panels are enhancing power quality in my region and reducing the load on their transmission lines.  

Thanks to net energy billing I get full retail credit for every kilowatt hour that I export back into the grid.  Essentially, the utility is paying me for the power I put into their grid and when I reach the point of generating more than a use on an annual basis I will not benefit financially, but that's fine with me.  The way that net metering works is that every kilowatt hour I put back into the grid gives me a credit in kilowatt hours.  For five months or more in the summer I accumulate credits that I then use up into October and November.  At that point the trade-off of solar powered heat pumps doesn't work so well because we have so little sunlight here at 45° latitude and those heat pumps require a lot of energy to operate.  My bills in January and February were over $350 this year.  So my goal is to accumulate enough credit in the summer to carry me all the way through the winter.

I'm 70 years old now and working at reducing my operating costs by investing some money in solar equipment now so that I don't have to pay it out later to the utilities who are constantly raising their rates.  Given the very low cost of solar panels right now, this makes good financial sense as the return on investment is better than the stock market.  


Wednesday, November 5, 2025

Adding 4 solar panels on the ground

Solar arrays on my workshop

 My solar power system consists of 37 solar panels mounted on my workshop building and another 250 W panel mounted on my house facing south.  The original 30 panels were only rated at 175W when I installed them 16 years ago.  Then I added additional panels rated 2 tilting 245 W panels and 6 more 375 W.  The problem is in the last few years I have added heat pumps which draw an enormous amount of power during the winter months and my electric bill shoots up from zero (actually, $42 minimum connection fee charged by my utility for the "privilege" of being connected!) through the summer to over $300 in January and February.

With electric rates increasing dramatically I am looking at options.  In my home I'm shifting back to using a propane heater for my living room because the heat pump is unreasonably expensive to operate and in both buildings I'm using more firewood to offset the use of heat pumps and fossil fuel.

Last winter when my propane automatic standby generator failed I was without power for four days and this was unacceptable so I purchased two solar panels and a battery generator as documented in this recent post.  Then in the spring I decided to use the battery generator as a backup power supply for my 3D printers and stored the solar panels inside my workshop.  I realized this was pointless because I was literally losing money from energy these two panels were not generating.


So this October I decided to deploy those two 195W bifacial panels and add a couple more similar panels but they're not bifacial, however monocrystalline panels are much more efficient in low light.  Bifacial panels can generate up to 15% more power from the back especially when there is snow on the ground to reflect light onto the back. 

The panels are facing south and tilted up at a high angle to account for the low winter solar elevation angle. 

Panel specs 


Here's a back view showing the bifacial panels on the right.  These are all made by a company called Eco-worthy who make very high quality and very affordable panels and I bought them on Amazon.


 I made my own mounting system using aluminum L extrusions that I riveted together.  This cost me roughly $40 per panel and should hold up well.  The whole mounting system folds up flat so I can take it down and store it should I need to.  Clearly, I will need to shovel snow away from the bottom of these panels in the winter.  But that's no big deal to me.


It's fall here in Maine and the time of year where we get very strong winds so I used tent pegs to secure the bottom of the mounting brackets firmly so they won't blow over.

(in mid December we got an unusual southerly wind storm that blew them all over.  Fortunately they were not damaged and I have repaired the broken mounts and will be securing them to the ground with big screw anchors)


All of my other solar panels are connected to the grid using micro-inverters made by Enphase.  (One micro-inverter for every solar panel).  However over the last 16 years 17 of the 32 original inverters have failed.  These were first generation technology and they have been replacing the failed units under warranty with seventh generation technology, but my 15 year warranty has now expired.  My trust in that system has eroded over time and I decided to use a string inverter.  String inverters take multiple solar panels connected in series and/or parallel and convert that to 120 V AC or 240 V AC.

Series-parallel connections

I connected the panels in this configuration as shown above which is the optimal one for best energy performance and the smallest gauge power cable required to feed the solar energy to the inverter.  The inverter wants to see a DC solar input from 22 V to 65 V.  By wiring two panels in series I get approximately 44 V and then by connecting them in parallel I optimize the power delivered to the inverter


I needed a couple of Y adapters in order to connect the two pairs of panels to the main cable that feeds into the inverter. Solar power cables use MC4 connectors which snap together and form a fully weatherproof connection.   These connect to red and black 10gauge wires that go across my yard for about 15 feet where they pass through the wall and down into my basement where the inverter is.


I purchased a weatherproof cable entry cover so I can prevent weather and critters from crawling in to my house.  These are typically used on campers and boats.

Down in the basement, I was able to install the (blue) inverter right next to my breaker panel.  I used more 10 gauge wire than I needed and tucked it up in the ceiling in case I need to move the solar panels.  Power comes out of the inverter at the bottom and that power cord plugs directly into an outlet to back-feed the outlet.  (This is known as plug-in solar)

This is a G2 Series Grid Tied Inverter (model SUN-1000G2-M) that I purchased on eBay very affordably.  It is rated for 1000 W and my four solar panels can produce up to a peak of 800 W so I might add two additional panels in the future which shouldn't be a problem for this inverter.

The little blue display above the breaker panel monitors a single 245W solar panel mounted to the south wall of my house.


The inverter has a very helpful color display screen that shows power being generated and also a chart of Watts versus time. This was taken around 9:00am.


I connected this AC circuit to my Emporia energy monitor so I can see live data of the energy being generated in real time.

I did a detailed blog post about the Emporia system I installed back in 2021.  It is a very affordable system that I use to monitor 8 circuits in each of my 2 buildings.  I can track energy flowing in BOTH directions - meaning that solar power shows as "negative" energy in the charts and readings.

Saturday, March 5, 2022

 I recently added one more 375 W solar panel to my south facing array.  I made a YouTube video that documents the process in detail to show how relatively simple it is for anyone with building skills to install a solar panel:

After installing a heat pump in both my house and workshop buildings I was hoping that my energy costs would be the same or at least go down a little.  It doesn't seem to be working out that way despite adding these panels, but the heating season isn't over yet.  My first electric bill was over $300, as was the second one.  But given that my propane costs for heating season run over $1000, I'm hoping that I'm going to come in a little lower than that.  

The primary reason for doing all of this is to get off of fossil fuels so I'm very happy with that.  and, what energy I don't generate with solar comes from a solar farm here in Maine, so I am essentially carbon neutral other than the modest amount of propane I use for cooking, clothes drying, and water heating.  eventually, I will tackle at least two of those issues and convert to electricity.

Now I am pretty much maxed out for solar panels, so there's not much room for improvement.


Wednesday, December 22, 2021

Home electrical energy monitoring with Emporia


Click here to buy


As an energy efficiency maven, I am always interested in looking for ways to monitor my energy usage.  The more I can learn about how my energy is used the more I can figure out ways to conserve.  Over the years I have experimented with different kinds of energy monitors and just recently discovered this very affordable home electrical energy monitoring system.   

An Emporia system like the one pictured above sells for around $160.  (click here to purchase one - As an Amazon Associate I earn from qualifying purchases.
This system allows you to monitor 16 separate circuits in your circuit breaker box.  A smaller 8 circuit system sells for around $100.  I have installed two of these systems, one in my workshop that also feeds through to the house and a separate system in the main breaker panel of the house.  

They also sell smart plugs that can be controlled by your home automation system.  These also connect into the monitoring system so you can monitor energy for specific plug in items:

I have ordered one of these to check out and might use it to monitor and control my AV system via my Alexa app and Echo devices.

Having recently installed heat pumps in both buildings and also added 5 375 W panels to my solar array, I wanted to see how everything was working out.   (I was a little shocked that my first electric bill since installing the heat pumps and upgrading the solar power system came out at over $250! - but my main reason for doing this was to stop using propane for heating both buildings and I think it will come out less expensive per heating season).

Installation is surprisingly easy so long as you're comfortable opening up your breaker panel and I had absolutely no trouble getting the system working within 1/2 an hour so.  below is a picture of my main breaker panel with the Emporia system installed:
circuit breaker panel with Emporia monitoring equipment

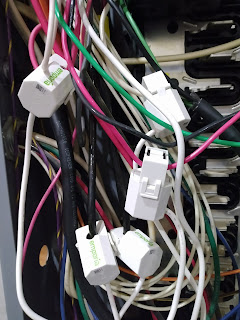
Yes, I know, it looks messy, but it is all safe and functional.  The system includes two very large 200 Amp current transformers at the top that measure all the power coming into the building from the utility:
200 amp current transformers installed

Then multiple small current transformers clip over the wires to the circuits that you want to monitor:

small current transformers installed

These are then all plugged into the monitor device that sends signals out via Wi-Fi. There is an antenna that pokes out through the wall of the breaker box that you can see in the bottom of the image:
Emporia monitoring unit installed in the breaker box

A few minutes after installing the app, I could see real-time energy data showing up in the form of graphs and lists of circuits that I had named.  I particularly like that you can configure it to record power from your solar power system.

Below is a screenshot from my phone showing my EV charging station feeding some power to my Chevy volt to keep the battery warm.  The temperature is hovering around freezing in late December here in Maine and my car draws power in small bursts to keep it warm in the winter when it's not actually charging.  While I knew this was something that was going on, it is educational and informative to see exactly how much power and how often it is used to keep the car battery warm.  Keeping the battery warm dramatically extends its useful life.

 
This screenshot shows a weeks worth of data for my house.  Clearly, the heat pump is the biggest energy user followed by a small 1.2 kW electric heater used in my small bedroom at night (the master bedroom is heated by propane).  Solar power in this breaker panel comes from one 240 W solar panel mounted on the side of the house.
list of circuits and the energy they are using

 This screenshot shows daily solar energy produced by my entire solar array of  36 solar panels:

screenshot showing my solar energy system daily generation

And this screen shows the hourly solar output for the last couple of days:
screenshots showing hourly energy produced by my solar system

Yes, the solar days are quite short in December here in Maine!

It is said that knowledge is power, so I am feeling quite empowered by all of this useful information!   I find myself opening the app on my phone several times a day and poking around through all the information to see what I can learn.  It is particularly interesting to watch the real-time chart updating every second to see the energy cycles of things like the heat pump, well pump, solar power system and EV charging station.


Saturday, November 20, 2021


Removing old solar thermal collectors

5 new 375W solar PV panels

A few weeks ago I completed the DIY installation of a mini split heat pump system in my workshop.  The system essentially replaces the solar heating system I built that used to use four large 4' x 8' solar collectors on the south facing shed roof of my workshop.  

I had installed the solar heating system 20 years ago and it had offset the use of propane over the years.  But that system could not begin to compare with the efficiency of electric heat pumps, and it is my goal to get off of fossil fuel as much as possible. The system used a few hundred gallons of propane last year.  Over the years I had learned to optimize the use of that system which originally used over 800 gallons a year, in the last two years it has been below 300 gallons.  You can see historical records of my propane consumption on this page of my blog.  The problem with fossil fuels is that their prices are unregulated and the cost of a gallon of propane has nearly doubled over the last 20 years.  

The propane tanks will remain in place to feed my automatic standby generator which is a necessity here in rural Maine.  Eventually I hope to replace that with a battery system since I can run that generator up to 7 days cumulatively in any given year due to extended power outages from storms etc.

The new REC brand solar panels are rated at 375 W each with a total theoretical maximum capacity of around 1800 W.  So far, I am seeing a maximum output of a little over 1400 W at noon at this time of year.  I don't have enough energy data for the new heat pumps to know whether this will completely offset the energy required to operate them.  But I am hoping it will.


mounting rails installed

inverter installed

I purchased a complete kit from the altE store in Massachusetts.  I simply called up my account manager, Ben and asked him to spec out a system that could produce close to 2000 W and cost less than $2500.  He specified everything that I would need including every single nut and bolt and it came in at around $2000.  I drove down to Massachusetts (a three hour trip) with my friends pickup truck to get all the equipment.  This includes five brand-new IQ7A micro-inverters made by Enphase.  These are state-of-the-art seventh generation devices that convert the solar panel power to 240 V that feeds right into my building.  (My original system used the M190 model inverter which was their first product over 10 years ago and 8 of those 30 units have failed over the years but were replaced under warranty).

I am so familiar with installing systems like this that I didn't glance at any documentation because it is so simple and plug-and-play for someone with my experience. 
The sequence involves:

  • installing mounting rails
  • mounting the micro inverters to the rails and connecting them to the umbilical
  • running wire from the breaker box to the roof
  • Mounting and connecting the solar panels

What could be simpler!

last year my solar power system provided all the power for my property from June through October. you can see historical statistics of my solar power system here.  I'm hoping these added panels will get me close to net zero.  Time will tell!

Here's a video I made about this whole project:


Saturday, August 28, 2021

Another mini Energy Recovery Ventilator for my home

Back in 2014, I installed a small TwinFresh Comfo Energy Recovery Ventilator (ERV) in my living room at a cost of about $500, and later added one in the master bedroom.  

These ventilators bring in fresh air without losing heat in the winter (and also without losing cool air in the summer).  The main reason for installing these units is that my house is so tightly sealed that there was insufficient air exchange to be healthy.  I determined this after doing a building energy audit that included a blower door test from which I learned that the total leakage area of my entire house was about 122 in.².  This means that the air changes per hour were down less than 3 ACH which is considered the low threshold for healthy indoor air. 

Since then, I have tightened up the house significantly.  This summer I had been noticing how the air in my small bedroom felt stale after I installed the air conditioner in the window and sealed up the other window.  With the door closed, there is no fresh air exchange at all in that room which is why I decided to add an ERV to that room.

These clever units work by removing air from the room and sending it through a honeycomb ceramic heat absorber.  Then the fan then reverses and brings fresh air in that is warmed by the heat absorber.  In my tests, I concluded that these units are about 97% efficient when the outside temperature is around freezing and indoors is in the mid-70s Fahrenheit. 

The ventilators I installed previously cost me around $500 - a search for "TwinFresh Comfo" will find varoius sellers offering prices ranging from $450 to over $700.  

This this time I did some research and found that they are available from Alibaba for significantly less,  I paid $185 plus ocean freight shipping  of about $58 and it arrived about five weeks later.  The unit was well packed and comes with clear instructions and appears to be very well made.

 
Well packed!

 Vitronic product photos:

The Vitonic brand appears to be functionally identical to the more expensive units in almost every detail except for the exterior vent cover.  Actually, the remote control works a great deal better than those other units!

Installation is relatively simple, I just cut a 6" hole in the exterior wall and installed the vent and tube through the wall from the outside and then mounted the interior bracket for the inside unit.


Cutting 6 inch diameter hole inside

Fan unit installed


External vent installed and caulked

There is a three button control panel on the unit itself, but it is the remote control that one generally uses.  This remote is identical to the previous units I had used except that it seems to use radio rather than line of sight infrared which means it has a range of more than 20 feet.  The other remotes only work within a foot or two which was very disappointing.

The remote features include three basic fan speeds: a night mode where the fan automatically drops to the lowest speed when the room is dark and three different airflow options, in, out, and bidirectional (energy recovery mode).  It is helpful to have a vent that can remove air from the room - or bring in fresh air in case of a strong odor.  It also offers three levels of humidity control and I have absolutely no idea how this is accomplished.  But it is this feature that distinguishes an energy recovery ventilator from a heat recovery ventilator and makes it more efficient and usable in humid situations.

I would only recommend installing heat (or energy) recovery ventilators if you are certain that your house is sealed up so tightly that air exchanges and air quality suffer.  The only other option for tightly sealed houses to install an entire heat recovery ventilation system which requires running ducts throughout the house and a large central blower unit that would be typically mounted in the attic or basement.  The cost of this type of system as a retrofit is prohibitive and can result in unsightly ducts everywhere, but it makes more sense when you're building a new home.

Sunday, April 25, 2021

My 1st generation Enphase microinverters are failing fast

10 failed microinverters


I was a very early adopter of the Enphase micro-inverter (devices that convert power from solar panels directly to 240 V AC right under the panel on the roof).  I began installing my solar power system in 2009 and added to it over the years to the point that I now have 32 solar panels each with its own micro-inverter.  My installation was the 1239th and there are now literally millions of these micro-inverters in the world.  In the intervening years Enphase have continually revised their products and they are now selling seventh generation microinverters.  Enphase were the pioneers of this technology and remain one of the front runners in the highly competitive field.

To date 10 of these micro-inverters have failed and Enphase have honored their warranty which goes to 15 years. I am now seeing one or more failures every year for the last five years.  The most recent unit to fail is shown in the chart below on the bottom left.  A major advantage of using micro-inverters is that they allow you to monitor each device and its power output in near real time.

Below you can see a recently removed failed device and the new one that looks quite different.  Each new micro-inverter comes with a different set of cable adapters as they evolve the technology and make it backwards compatible with the early models.

Failed, and replacement micro-inverter.

New inverter is smaller lighter and form fits to the components

Every time one of these units fails, I go on to their website and order a replacement - a process that is made quite simple for me as a self installer (rather than end-user).  To replace these inverters, a friend and I need to go up on two ladders, remove the solar panel to access the inverter underneath and then unplug and replace it.  This takes about an hour to do this safely and carefully.

While I am very pleased that the warranty is being honored, I am concerned that I have only four years left on the warranty on some of my older devices and will be left having to buy them at over $200 each when they fail after that.

Thursday, September 12, 2019

Failing 1st generation microinverters


10 years ago when I began installing my solar power system, I was one of the first to use the new technology of microinverters made by Enphase.  (Details of my installation here).  These are small devices that convert DC solar power to 240VAC in a small box mounted behind each panel.  Original model shown above, and new one shown below.


I was a very early adopter, mine was the 1239th system commissioned back in 2009.  Now there are millions of systems, and they are up to 6th generation technology. The devices come with a 15 year warranty and I'm at the 10 year mark and have just replaced the 7th failed unit out of a total of 32.  I am able to see which ones failed from the web interface that reports performance in near real time.


It is a chore to climb up on the roof with a friend and 2 long ladders.  We have to remove the 30lb solar panel, set it aside, remove the failed microinverter and replace it, then replace the solar panel.  It takes up to an hour to do this safely and carefully.

What I really like about this system is the granularity.  I can see the performance of the system on a per-panel basis and failures are easy to spot.  And I can scroll through the recent day or week to see how the system is performing.  Below is overall power for the last week with peaks at around 4kW.


I'm hoping that Enphase will continue to replace them if units fail after the 15 year warranty.  Despite these setbacks, the system is performing very well and I am powering my home, workshop and Chevy Volt for free for up to 7 months of the year.

The pattern of failures is interesting, they seem to propagate over time: