Translate

Wednesday, December 28, 2022

Whole house surge/lightning protection


As an engineer, I have a lot of electronic equipment in my home and separate workshop building.  While I could plug all of these items into separate surge strips, that would be unreasonably expensive and would not offer as much protection as installing a Delta surge protector in the main breaker box.  These devices are designed specifically to absorb the massive energy spikes that come from lightning and other transients.  

I installed this equipment in my breaker boxes many years ago and I'm really glad that I did!  I remember sitting on my front porch watching a massive thunderstorm come through and I saw a lightning strike hit the power pole 20 feet from workshop building with a massive FLASH-BANG that was terrifying. (That's not my home in the video above). 

The next day I noticed that my appliances were making a humming sound so I checked the voltage of the electrical outlets and found that I was getting 140 V AC and not the specified 120 V AC.  This implied that the pole transformer had been damaged by lightning so I called the utility company.  They showed up literally 20 minutes later with a replacement transformer and it took them about 1/2 an hour to replace it.  If I had not installed surge protection I would have lost thousands of dollars worth of electronic devices including all my consumer items like TV, DVD, stereo, computers and kitchen appliances like the microwave etc.  The only item that fell victim to that massive lightning strike was my cable modem because there was no protection on the cable line.  I have since added protection for the cable itself.

My house is on a rise in rural Maine surrounded by tall trees and lightning has hit and destroyed a couple of trees near the house.  My workshop building has 38 solar panels mounted to the roof.  For this reason I hired a company to install lightning rods on both my home and workshop building.  Back in 2010, they installed the systems at a total cost of around $3500 for both buildings. 


The roof mounted rods are connected to very heavy woven copper wires about 1/2" diameter that run down to two opposite corners of the building where they are connected to ground rods pounded deep into the ground.  If you are at all concerned about the risk of lightning hitting your home this is your first line of defense.  Lightning frequently destroys homes with fire and explosive damage.


Tuesday, November 1, 2022

Bedding in my garlic with wood shavings from my bowl turning classes


it's early November and the time of year when I plant garlic so it will come up in the spring.  I purchase heirloom garlic from the local farmers market and simply break off cloves and put them in the dirt about 2 to 4 inches down.  Then it is recommended to cover them over with mulch to protect them.  So I use shavings from the wood turning classes that I teach.  (More info about those classes here).  In the spring I purchase basil seedlings from the farmers market and plant those in the same vegetable beds.  The whole idea here is to make basil pesto from a combination of my own plants and garlic.  I typically can nine or more 8 ounce jars of pesto and store them in the fridge to tide me over through the winter.  And of course I enjoy garlic and many of the foods and stir fries that I prepare.

I also use my wood shavings for litter and kindling to light my wood stoves - one in my home and one in my workshop.  This particular batch of shavings includes some Osage Orange shavings that a student sent me from a tree on his property in Texas.  Here's a photo of the prepared bowl blank and a finished bowl:


 This blend of shavings looks quite nice on my vegetable bed:

I rake the shavings off once I see shoots poking up in the late spring and will either dump them out in the woods, or mulch them in two other garden beds.

This is all about living sustainably for me and also being self-reliant and saving money.


Monday, October 31, 2022

100% Recycled paper


When I buy printer paper from Staples (or any other office supply source), I always spend a little extra to purchase 100% recycled copy paper from a forestry certified source.  Staples also sell 30% recycled content office paper that is slightly less expensive.  It's a simple way to vote with my dollars for a more sustainable planet.  if more of us did this, we would support an industry that creates fully sustainable paper.

In my small town here in rural Maine we have a biweekly pickup of mixed stream recycling of plastics, metals, paper and cardboard.  I like to think that some of the paper I recycled has been turned into fully recycled content that I then purchase later. 

Sunday, October 9, 2022

Chives from my garden


I have two chives plants in my garden beds, on the left is regular chives and on the right, garlic chives.  The chives plant is over 15 years old and the garlic chives I've had for over three years now.  These are the only perennials in my vegetable beds and I use fresh chives in scrambled eggs and stir fries throughout the growing season which runs from April through October.  Today was our first frost night so I have harvested a bunch of chives and dried them for use through the rest of the year.

I cut them up with scissors and lay them on parchment paper and then put them in the oven at 150°F for about half an hour or so.

Once dried I store them in an 8 ounce ball jar with a reusable plastic lid.  4 to 5 ounces usually lasts me through the winter and into the spring.  

I usually make scrambled eggs with fresh chives and shredded cheddar cheese.  Back when I was running an air B&B from my home my guests really enjoyed my special scrambled eggs.  They would watch as I walked out to the garden to cut fresh chives for the breakfast and enjoyed the local resource.  I would also use locally sourced free range chicken eggs that I bought at the farmers market.  Garlic chives when fresh have a real zing to them that have a definite garlicky flavor.

I enjoy making optimal use of all of the resources on my property as part of my commitment to living sustainably.


Monday, September 26, 2022

Solar water heating - 16 years of practical use


Solar water heating collectors

Back in 2006 I installed solar collectors on the side of my house that preheated water before it went into a propane water heater tank.  (see my detailed blog about this installation).  

demand heater on left
40 gal. storage on right

When that water heater tank failed in 2010 I replaced it with a propane demand unit that uses a lot less propane because it only fires up to heat water on an as-needed basis.  Standard water tanks - whether they are heated with gas or electricity waste a lot of energy by maintaining the heat in the tank that leaks out and has to be topped up all the time.

The company that made this complete kit that I purchased was called Butler Sun Solutions, and sadly they are no longer around because Barry Butler the founder has died.  Barry was an absolute genius and designed a very simple very affordable system that could be retrofitted into standard water heater tanks.  Since installing the system, I have done many upgrades and improvements.  But the original design as built had a break even cost (after incentives) of about five years.  I paid around $3000 for a complete kit and state and federal incentives reduced that to about $1500.  


One of the improvements I made was to put a "dashboard" on the window frame above my kitchen sink so I could monitor temperatures of the solar collectors and the storage tank.  As you can see from the photo above - the 40 gallon storage tank as reached 91.5°F.  The peak temperature of the collectors was over 150°F before this photo was taken in the afternoon.


screenshot of live statistics

I built a webpage that shows live real-time statistics of the performance of the system, click here to see that page.  As you can see, on a clear sunny day the water tank temperature can reach well over 100°F.  Sudden dips in the tank temperature are due to hot water usage such as dish washing and showers etc.

There are trade-offs to having a propane on-demand water heater.  Hot water does not arrive as quickly as it would from a storage style tank, however you can take really long showers because the water is heated as needed continuously.  The other trade-off is that when the solar storage tank temperature is above 100°F the demand heater gets confused and doesn't contribute heat, so there are sometimes periods where the shower gets cooler for a while before everything evens out.  These are small compromises that I'm comfortable making in order to leave the world a better place by reducing my use of fossil fuels.

What I've learned about the performance of this system is interesting.  I get the best performance around the spring and fall equinoxes.  Since I am at a latitude of approximately 43°, this means that the ideal tilt angle for the collectors to orient them optimally towards the sun would be at 43° (or rounded off to 45° for a typical roof slope).  But since my collectors are mounted vertically to a wall I'm sacrificing performance.  So in the summer when the sun is at its highest, the sun angle is least optimal and performance is compromised, conversely in the winter when the sun angle is much lower, the performance is improved, but with the trade-off of colder temperatures that limit how hot the water can get in the collectors.  Here in Maine, the average temperature remains below freezing for months in the winter and can dip well below 0°F

So clearly the maximum benefit of this system is in the spring and the fall where my demand water heater only has to make up the difference in temperature between what is in the storage tank and 120°F.  My well water temperature is about 50°F which is tempered somewhat by a pressure storage tank in the basement for a net of about 60 to 65°F.  So any increase above that threshold reduces my propane consumption.

I update the chart above every year to reflect the heating season's usage and costs.  As you can see I have reduced my gallons per year from around 800 gallons to as little as 111.5 gallons in 2020.  The red line represents dollars per gallon and clearly the cost of propane is extremely volatile and unpredictable.  However as you can see from the blue line my annual costs are going down despite increasing cost of propane.

So the net result is I am reducing my carbon footprint significantly while also saving money on my water heating costs.  Clearly, it's a win-win!

I realize that not everyone is inclined to do a DIY installation like mine, but the systems are not unreasonably expensive, especially in southern climates and the return on investment is typically less than 10 years.  Most competent solar installers can install something like this.  

As the news is constantly filled with epic climate crisis triggered events, it's time we all buckled down and did what we can to reduce our fossil fuel footprints.  Thousands of people are dying every year as a direct result of the climate crisis, and those of us with disposable income can afford to make adjustments for the betterment of mankind.


Monday, September 19, 2022

Home grown food

applesauce in jars
This year's applesauce

I live near the coast of Maine where the growing season is relatively short. Nonetheless I manage to harvest quite a bit of food from my property.  For me, living sustainably entails optimizing use of my land and natural resources.  And I like the idea of having my own homegrown and affordable food sources.

It is mid September as I write this and I have recently canned several jars of applesauce. The apples on my tree are small and very sweet and I often pick one just to eat during the day, and I give away or sell my applesauce to friends and neighbors.

Tuesday, August 23, 2022

Replacing a 4ft. fluorescent with an LED equivalent


New LED light - and old fluorescent

I teach wood turning classes in my workshop (https://www.arttec.net/Bowl_making_class/index.htm) and it is important to have plenty of good quality light.  So for years I have had a 4 foot fluorescent fixture right above the lathe, but recently I have been concerned that flying bits of wood that spin off the lathe could go up and hit and break one of the fluorescent tubes which would be really bad.  

As you may know, fluorescent tubes contain mercury, and I recently took a bunch of bad tubes into my town transfer station for safe disposal.  So I decided to upgrade that fixture to an LED equivalent and I'm very pleased with the result.  And of course LEDs do not contain Mercury and are not made of glass so I'm sure they can take a hit without concern.

This new fixture cost about $60 at my local ACE Hardware store which is not cheap, but you can find more affordable ones on Amazon. (As an Amazon Associate I earn from qualifying purchases.)  I hoped it would use less power, but it is a great deal more efficient.  Using my power meter, I learned that the fluorescent was using about 46.3 W while the new LED uses about 42 W  LEDs are generally rated for about 50,000 hours which is many more hours than you get from a fluorescent tube.  .

The brightness and color rendition index (CRI) are much better with the LEDs. I used my light meter to compare them and as you can see, the LED is more than four times brighter!

I'm really pleased with this change because I no longer have to worry about safety or disposing used fluorescent tubes.  Eventually, I will replace several other similar 4ft fluorescent units with LEDs.


It is also convenient that these fixtures can be daisy chained, there's a two-pronged socket on the end that allows you to plug another lamp into it.  This can really simplify shop light wiring.  Another plus!


Friday, July 29, 2022

Induction cook top, pans, and a repurposed rug

In my ongoing effort to reduce my carbon footprint, I have replaced my propane heating systems with heat pumps in both my house (see this post) and workshop (see this post).  Then I added six more 375 W solar panels to my solar array (see this video).  

It's near the end of July 2022, and I've started picking my blueberries and making blueberry jam which involves using my propane stove daily for about half an hour to boil the jam down.  I make batches of five jars and use one pot to boil the jam and another one to boil the jars to sterilize them.  

Running the propane stove this much has always bothered me both due to the fumes, and the carbon footprint.  So I did a little research and found that you can purchase an induction cooktop for under $50.  (As an Amazon Associate I earn from qualifying purchases.)  This surprised me because I thought they were much more expensive.  So far I am quite pleased with this unit that can pull up to 1800 W and can be set as high as 450°F.

click image to order this from Amazon


I didn't have the right cookware - most of my pots and pans are either stainless steel or aluminum which will not work with an induction cooktop unless the stainless steel pans have a steel base.  The only thing I had that would work with an induction cooktop is my wok shown above on the right.  So I went over to Goodwill and took a fridge magnet with me to test the bottoms of the pots and pans.  Induction cooktops will only work with ferrous metal cookware - that includes cast iron and steel pans and also stainless steel pans with a steel base.  It's simple enough to test for ferrous metal by just using a magnet, if it sticks it will work with an induction cooktop.  I quickly found a nice frying pan for five dollars and a Farberware sauce pan with lid for $10 (shown above), both are in excellent condition.  These three pieces of cookware should fulfill most of my needs.

While I was in Goodwill I noticed a rack of 5 x 7' rugs with a recycle logo on their labels so I looked closer and learned that they were made from repurposed carpets.  I had read about companies that are doing this, and I'm happy to support that industry.  I find it amusing that the label says: "Made from 100% undetermined fiber".  I'm trying it out in my front hallway, but may move it to cover the tiled floor in my basement.  I tend to track in a lot of dirt and grass clippings as I come and go, and a rug like this will help me wipe my shoes off and keep me from tracking dirt in to the house.


Wednesday, July 13, 2022

My E-bike and repurposing a replacement wheel


A year or so ago I purchased a new E-bike made by Ancheer for around $700.  It is one of the most affordable and highly rated E-bikes on the market and mine came with a 250 W motor in the rear hub.  (Click here to buy one - as an Amazon Associate I earn from qualifying purchases.)  After about 500 miles of pushing it really hard the motor failed on a steep hill.  I reached out to the manufacturer and they immediately offered to replace the motor.  Then came back a little later and said they didn't have motors available so they would send me an entire new wheel and tire.  Needless to say I was very impressed!

I certainly did not want to just put the old wheel in the trash so I took it to my local bike shop, and they said they could reuse almost all the parts except the burned-out motor and were happy to have it.

The replacement wheel came packed in a very sturdy cardboard box filled with chunks of white foam and also a dozen or so big bubble pack envelopes that they must have had around.  I took the bubble pack envelopes to my friend Tracy at Saltbox Pottery so she could use them for shipping her plates and she was grateful to have them.  Of course, the cardboard box was easy to cut up and put in the recycling bin.  I will also repurpose the white packing foam for shipping products.  I can cut that stuff to size with my bandsaw as needed.

This is all about living on a planet with finite resources and reusing and repurposing things as much as practical.

The reason I added large panniers to the bike is so that I can pick up trash and redeemable/recyclable cans and bottles that I find along the side of the road here in rural Maine.  Some days I fill both panniers!


Monday, July 4, 2022

Video documentation of my recent septic system replacement

When my septic system failed suddenly at the end of April 2022, I had to scramble to replace it.  It turns out that the original system was over 50 years old and pre-dated state laws requiring that designs be filed with state and town offices.  So there was no record of the design or layout.  I had to pump out the tank immediately $350), and my renter and I went into extreme water conservation mode.  We were able to reduce water consumption (from my well) by 50%, and it took us 4+ weeks to fill the 1000 gallon tank which needed to be pumped out again before work started.  The 2nd pump-out was less expensive ($250) because there were almost no solids to process.  And it was pumped out again right before the crew replaced the tank.

 I re-financed my house to cover the $21,600 cost and hired a soils expert ($550) to assess the site and engineer a new system.  That plan was then approved by the town codes enforcement officer and I put the job out to bid.  My small town of about 3300 people has 3 family owned earthworks businesses, and one company could start in early June.  The work took over a week with a few days off when it rained.  

They did an impeccable job and put everything back the way they found it or better.  I mean the lawn was totally torn up by 10 ton trucks driving over it and they put in new loam and seeded it with grass which is growing in nicely.  I asked them to remove a garden bed that they were driving over anyway and made that into lawn.  That bed had gone to weeds because I really don't care about flowers, just food that I can grow and eat or sell (see below).  The only flowers I keep are inside, I have several orchids and a giant 24 year old Philodendron that all do well with my green thumb.

I documented the whole process in both time-lapse - with a dedicated camera mounted to a tree so it could see the whole area, and my video camera for live action footage.  The result is 2 videos that I published on YouTube.  The shorter time-lapse one runs about 8 minutes:

And the longer live action one runs about 18 minutes:

It was all quite an adventure, and I was obsessed with watching the crew working.  I enjoyed talking with them in their breaks.  They did an impeccable job.  Now I can relax and not worry about my septic system since the new design should last over 40 years with proper care.  This means pumping out the tank every 3-4 years at a nominal cost of around $350.

Rural living is a bit like living in a space station because you are responsible for your water and sewage processing, and with my solar power system I'm generating almost all the power I use.  I also grow a lot of food, and compost my organic waste.  The compost feeds my vegetable beds and blueberry bushes. I canned 30+ jars of blueberry jam and 13 jars of basil pesto last year, and ate lots of other fruit and veggies.  Living off the land!


Sunday, June 26, 2022

My new 27 inch Greenworks cordless lawnmower


A year ago I purchased a small 20" Greenworks cordless lawnmower to replace the old 22" gas lawnmower that I had converted to electric many years ago, here's a link to my blog post about those mowers.

Last year my friend Roberta purchased a small property in the nearby town of Bath that has a very modest lawn and I encouraged her to get a cordless lawnmower.  This spring she went over the top and bought a giant 27 inch Greenworks machine.  This beast runs on two huge, heavy 80 V batteries and is also self-propelled.  I went over to help her un-box it and try it out and she quickly realized it was much bigger and heavier than she expected and massive overkill for her small lawn that is not much more than 1000 ft.².

So I proposed a trade, I would give her my 20 inch mower plus some cash and she would give me her new mower.  We are both very pleased with this exchange since the mowers we now have are perfect for our properties.  My lawn area is over half an acre and this big new mower is a joy to use especially in the heat of the summer when the self-propelled feature is a real blessing.  I also have a cordless weed wacker, hedge trimmer and chainsaws that I use a lot.

In the 20 years or so that I have lived on this quiet dead-end road in Maine I have encouraged many of my neighbors to embrace more sustainable lifestyles which includes buying an electric car, subscribing to solar power, and hopefully soon they will be replacing their stinky old gas lawnmowers with electric ones.  Some of them already have other cordless electric yard tools.

Scientists are warning that we are crossing the tipping point with the climate crisis and there may be no turning back.  This is why I do what I do!  I carry a constant awareness of future generations and the massive impact the climate crisis will have on their lives.


Failed septic system and energy monitoring update

In late April my septic system failed.  This constituted a household emergency and I had to scramble to get a new system designed and installed.  For those of you in the city unfamiliar with septic systems the sewage comes out of the house and goes into a large underground concrete storage tank that is typically 1000 gallons for a two bedroom house like mine.  Solids settle out in the tank and the liquids come out the other side and go to a leach field.  I have been doing proactive maintenance and having the tank pumped out every three years, but apparently the system was just so old that it eventually failed.  Where the pipe enters the leach field there is a distribution box that spreads out left right and center to feed perforated pipes buried under the ground.  When I exposed my distribution box I found that it was completely plugged up with gunk:

Distribution box opened up

In fact the entire pipe from the septic tank to the field was also plugged up.  From what I can tell this system was installed in the 1970s before the state required that records be maintained in the state house and local towns.  So I immediately hired a soils expert to design a new leach field ($550) which required him to come out and survey the land and test the soils figure out how big and what type of septic leach field to engineer for my location.  I took his design to my town office to get a permit approved for the construction of a new system and then put the design out to bid to local companies.

It turns out that my small town of Woolwich, population around 3300 has three family-owned  earthworks companies.  I ended up hiring Creamer and Sons Landworks.  Joe and his two sons started work in early June and it took them about seven working days to complete the installation, here are some photos:

Creating a berm around the Leach area
Crushed rock laid in.  The leach field pipes sit on top of this gravel.

They began by hauling off all the surface vegetation and dirt which they could later screen and process and bring back. Then they built up a berm out of sand and then loam and then installed the leach field inside the berm by laying down sand, then crushed rock then perforated pipe, then more sand, and then finally a layer of loam.  The town code officer approved the first step of the construction and later came back to approve the crushed rock installation as seen above. 

There were 5 ton and 10 ton trucks coming and going right through the middle of my lawn and at the end they put everything back with new dirt and grass seed and my new lawn is growing back in.  This whole project cost me over $21,000 and I had to refinance the house to pay for it.  They did an excellent job and I'm sure the system will last longer than I will!  Click here to see a blog post that links to two videos I made about the entire process.

Between the initial failure when I first had my septic tank pumped out to give me some time I had to pump it out a second time.  When they pump out just liquids they charge less - $250 compared to $350.  My housemate and I were able to dramatically reduce our usage of water by approximately 50% in order to defer further costly pump outs before the new system could be installed.

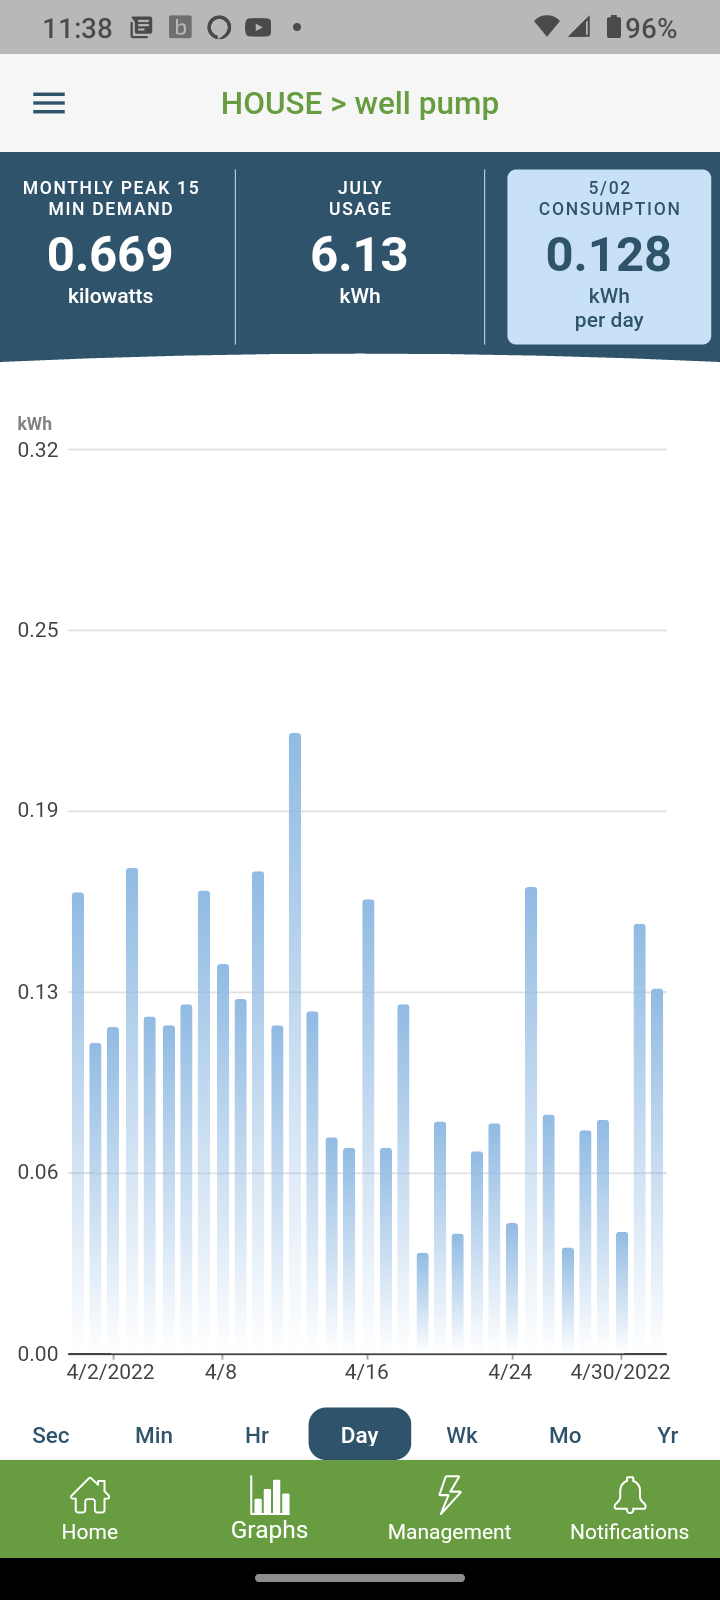
From an energy monitoring standpoint, I was able to clearly determine that we had in fact reduced our water consumption significantly by looking at the energy consumption of my 1500 W well pump which is down about 100 feet below ground in the granite.  Here's a screen from my Emporia energy monitoring app (see my previous post about this here) showing daily well energy consumption before and after extreme conservation measures:

Well pump energy

It looks like we reduced water consumption by approximately 50% and us guys were able to pee outside a lot since my property is rural and private.  Like many rural male Mainers I pee outside quite often anyway since it's an 80 foot walk to the house from my workshop that does not have plumbing.

After the septic system was installed I needed to run a sprinkler for an hour or so every evening to water in the grass and clover seeds I planted.  The contractors put grass seed and straw in the area where they replaced the existing lawn, and I elected to seed the whole septic area with white clover which is lower maintenance and good bee habitat. Clover is also a good nitrogen fixer that out competes weeds and grass.  

leach field planted with clover

sprinkler, and lawn  growing  back in

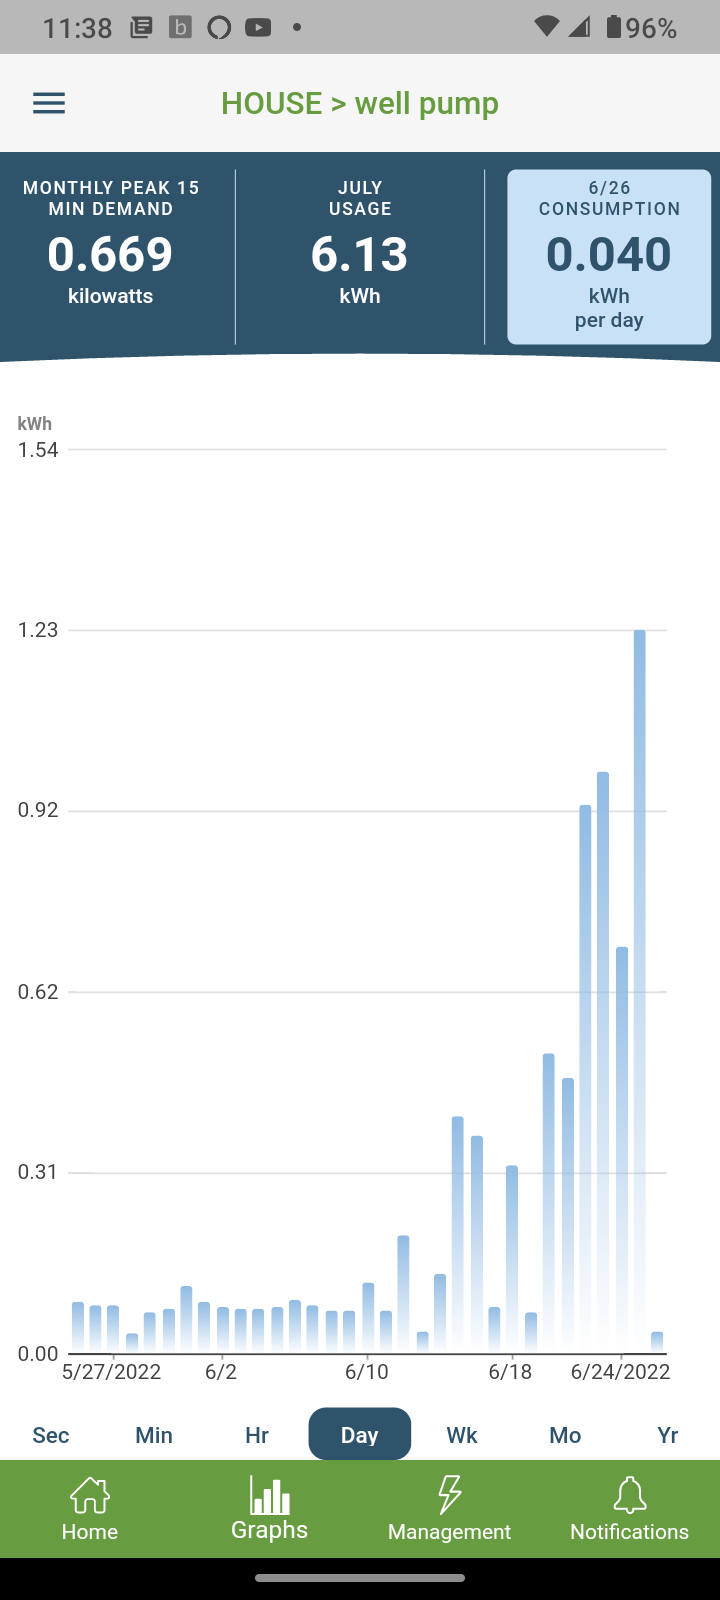
 The daily energy chart below shows a dramatic increase in my well pump usage to keep all that new loam nice and wet.

Well pump after septic installed

If I did not have a solar power system (38 panels producing a peak of over 8 kW) I would see a significant increase in my electric bill to run that pump so much.  Starting in mid-May, my solar energy production exceeds my needs and the utility allows me to bank my kilowatt hours as credit that I can use in the fall and winter.  The bottom line is that it is costing me nothing to run my well pump for hours!  The weekly energy chart for my entire property below shows that I was using a lot of energy to run my two heat pumps in the winter when I have much less sun here in Maine at the 43rd parallel.  As I get more sun and the weather warms up reducing the need for the heat pumps, eventually the solar starts producing a surplus in May.

weekly net energy consumption

My electric bills spiked up over $300 for a few months in the dead of winter mostly due to the heat pumps that I installed, but this is a lot less expensive than heating with propane as I had in the past.  But then from May through October, I will pay the utility just a connection fee of around $13 a month and I will use my accumulated credits to cover my energy use into November and December hopefully.

You can see a video about my recent installation of additional solar panels on YouTube: https://www.youtube.com/watch?v=hl8r-gZupfE

 I find myself checking energy use on the Emporia app every week or so to see what is using the most energy.  The biggest energy consumers are my (self installed) heat pumps, one in my house, and one in my workshop.  Here's a weekly chart of energy for my house heat pump:

It was working hard during the winter to keep my living/dining room area warm when temperatures remained below freezing for weeks at a time.  As you can see, energy use plummeted in May when I often shut it off completely, but now in late June I am turning it on for cooling but it uses a great deal less energy for that.


Monday, April 18, 2022

Effective tick control on a budget

 It's spring in Maine and the crocus and daffodils are starting to come up and it's time to start thinking about tics.  Last year I purchased a product called Thermacell Tick Control:  (Click here to purchase on Amazon - As an Amazon Associate I earn from qualifying purchases.)


It's basically a cardboard tube with cotton balls soaked in permethrin - the stuff that kills tics on contact and you typically spray it on your clothes.  You get six tubes for roughly $20. You tuck these tubes into nooks and crannies in the yard around your home.  The theory is that small rodents will use the cotton as nesting material and get permethrin on their bodies which will kill tics on contact and reduce the breeding population.  When I used this product last year, I saw dramatic reduction in the amount of tics I found on my body.  While I did find a few ticks on me in the early spring, there was almost nothing after that and I walk around in the tall grass on my property quite a bit.


 I realized when I was opening a vitamin bottle recently that I could use the cotton packing and just spray it with permethrin myself.  This stuff is really nasty, so I took it outside and sprayed it on to the cotton on-site and then tucked it into the bottom of my woodpile.  I wore surgical gloves when I did it because I don't want to get any of that nasty permethrin on my hands.  I have done this a few times now and every now and then I will see bits of cotton tucked into different places in the bottom of my woodpile and elsewhere, so I know that chipmunks and mice are using it.

Saturday, March 5, 2022

 I recently added one more 375 W solar panel to my south facing array.  I made a YouTube video that documents the process in detail to show how relatively simple it is for anyone with building skills to install a solar panel:

After installing a heat pump in both my house and workshop buildings I was hoping that my energy costs would be the same or at least go down a little.  It doesn't seem to be working out that way despite adding these panels, but the heating season isn't over yet.  My first electric bill was over $300, as was the second one.  But given that my propane costs for heating season run over $1000, I'm hoping that I'm going to come in a little lower than that.  

The primary reason for doing all of this is to get off of fossil fuels so I'm very happy with that.  and, what energy I don't generate with solar comes from a solar farm here in Maine, so I am essentially carbon neutral other than the modest amount of propane I use for cooking, clothes drying, and water heating.  eventually, I will tackle at least two of those issues and convert to electricity.

Now I am pretty much maxed out for solar panels, so there's not much room for improvement.